Author name: TileProf

Bathroom Floor Grout Before After Cleaning Colouring Romiley

Bathroom Floor Tile Grout Renovation in Romiley

This client in Romiley on the outskirts of Stockport was unhappy with the state of the grout in her bathroom and was looking to have it removed and replaced. This was complicated by the fact that the ceramic tiled floor had electric underfloor heating installed (UFH). Removing grout is an intensive process and there is a big risk of causing damage to the heating elements during the process.
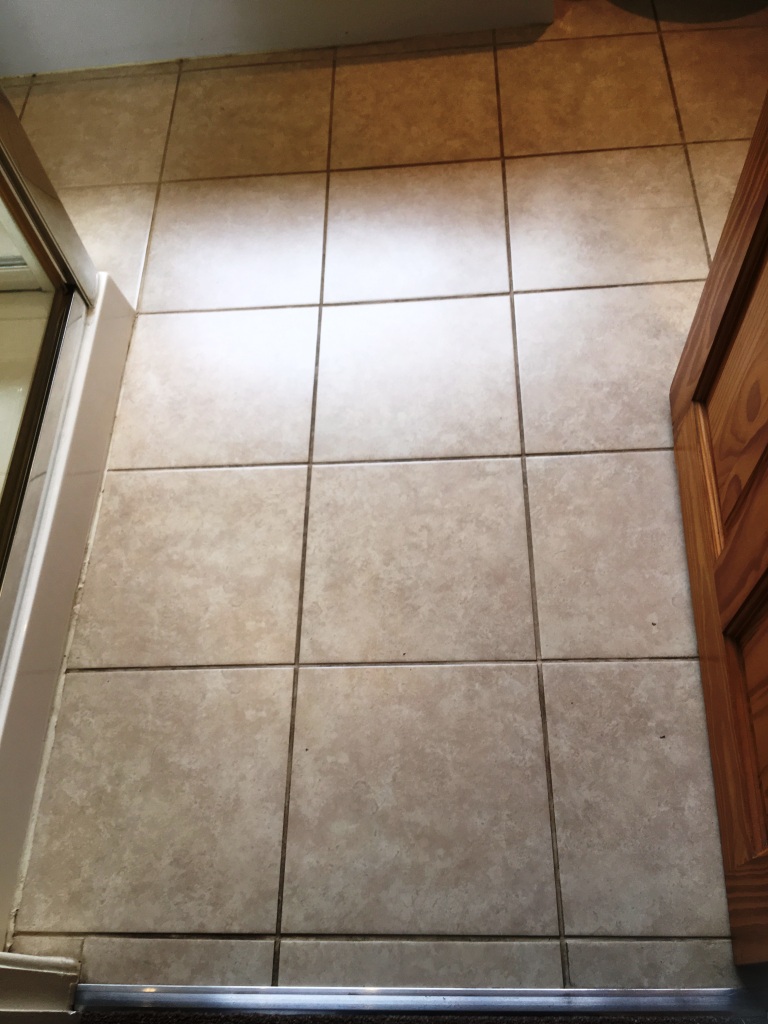
Bathroom Floor Grout Before Restoration in Romiley

My solution to the problem was to give the grout a deep clean and then colour it. Grout colouring is by far the easiest and safest way to restore grout as it is applied to the surface of the existing grout without the need to use any invasive process to remove the grout first. There are a variety of colours available so we can get the floor restored to its original look quite easily. I discussed with the client what we needed to do, and we agreed a price for the work to be completed.

Renovating Bathroom Floor Tile Grout

The process I used was to apply Tile Doctor Grout Clean-up to the tiles and the grout and then scrub it in. This is an acidic product that cleans up grout and removes any mineral deposits and hard water marks on the tiles. Being an acidic product, it also etches the surface of the grout providing a better bond for the colourant to adhere to. The floor was then rinsed with water, and a steamer used to get as much of the staining out of the grout as possible. The soiled water was removed with the wet vacuum to minimise the mess.
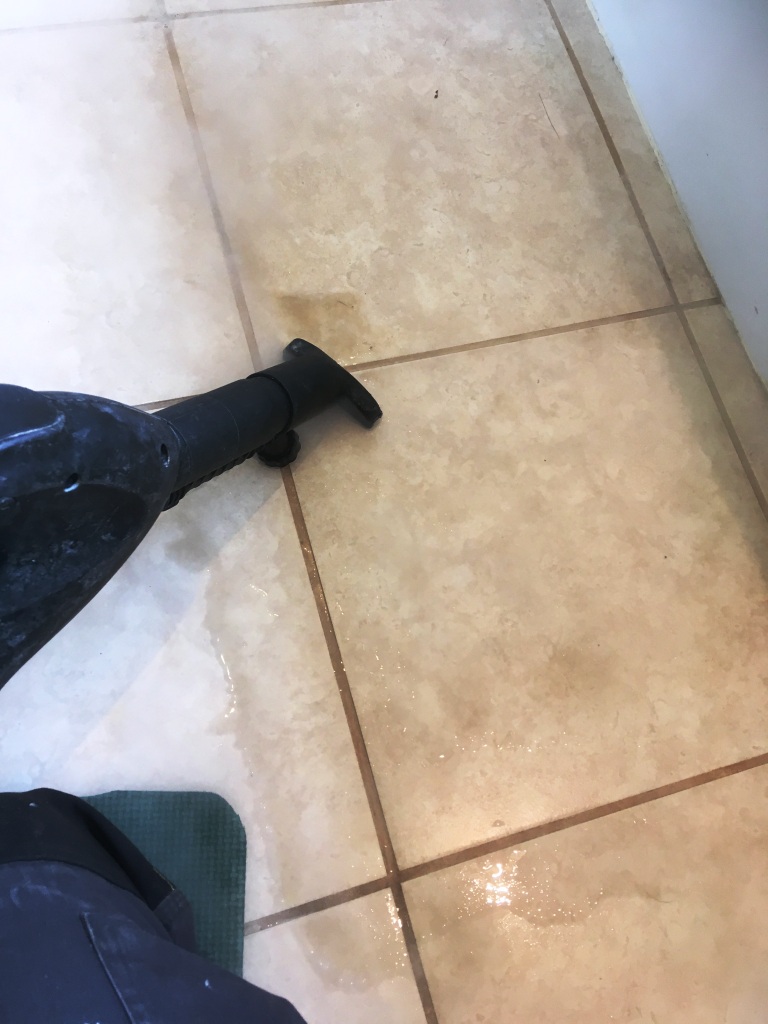
Bathroom Floor Grout During Steam Cleaning in Romiley

The tile and grout were then speed dried with an air mover whilst I went for lunch. This would ensure the floor would be ready for the colourant to be applied by the time I returned.

Colouring Grout in a Ceramic Tiled Bathroom

When I came back an hour or so later, I checked the grout was dry with the moisture meter before proceeding to apply the colourant. It was a small bathroom so only one bottle of Tile Doctor Limestone Grout Colourant Kit was needed we chose Limestone as this colour matched the tiles quite closely. The colourant is carefully applied with a small brush, and any residue is wiped off the tiles as we go.

Bathroom Floor Grout After Restoration with Tile Doctor Limestone Colourant in Romiley

The client was very happy with the results and with the colourant forming a barrier over the grout it will prove much easier to clean and will stay looking good for quite some time to come. The process was quick and straight forward and as you can see from the picture below the tiled floor looked a lot more inviting once the work had been completed.

Bathroom Floor Grout After Restoration in Romiley


Professional Restoration of a Ceramic Tiled Bathroom in Greater Manchester

Bathroom Floor Tile Grout Renovation in Romiley Read More »

Shower Cubicle Before After Renovation Chorlton-cum-Hardy

Grubby Tiled Shower Cubicle Renovated in in Chorlton-cum-Hardy

Shower Tile and Grout renovation is a speciality of ours and has made us popular with landlords who understand properties are easier to rent when the bathrooms look fresh. This was the case with this shower cubicle at a rental property in Chorlton-cum-Hardy which is a popular suburb of Manchester south of Old Trafford.

Grubby Shower Cubicle Before Renovation Chorlton Cum Hardy Rental Property

The shower cubicle was in quite a state and well overdue a deep clean. You can see from the photographs that the shower tray was very dirty, the white ceramic wall tiles were grubby, the white grout had gone black and the silicone sealant had darkened with mould.

Grubby Shower Cubicle Before Renovation Chorlton Cum Hardy Rental Property

Cleaning a Grubby Shower Cubicle in Chorlton

Working in sections from top to bottom I began the cleaning process by treating the tile and grout with Tile Doctor Duo-Clean which a double action cleaning product. Duo-Clean is a recent addition to the Tile Doctor range and combines the properties of an effective tile and grout cleaner with a mould remover. It cleans and can remove mould and blackspot from grout and silicone, so an ideal product for cleaning up neglected shower cubicles.

The spray attachment mixes the product with air making it light and allowing it to easily stick to vertical surfaces where it can get to work breaking down dirt and mould. It was sprayed onto the wall tile and grout and then left to dwell for five minutes before being scrubbed in with a stiff brush. The area was subsequently rinsed with water to remove the soil. In some stubborn places, I didn’t achieve the desired result right away, so I repeated the cleaning process a couple of times before moving onto the next section. I can tell you a lot of elbow grease was expended on this particular cubicle, I even cleaned up the shower tray which had gone green with an accumulation of soap scum.

When the tile and grout was cleaned to the best of my abilities, I used a heat gun to dry the walls quickly. Next, I removed all the mouldy silicone around the shower tray with a sharp knife and then further dried the area.

Sealing Shower Grout

After everything was cleaned and dried, I sealed the grout using Tile Doctor Wall Tile and Grout Sealer Aerosol Spray. The tiles were glazed ceramic so won’t accept a sealer however the top layer of grout is porous which makes it vulnerable to dirt, grease, mould and limescale. Sealing will therefore ensure it keeps its appearance for longer and reduce the need for regular maintenance. Being a spray on sealer it’s very easy to apply, all you have to do is wipe it off the excess sealer from the adjacent tile afterwards.

Grubby Shower Cubicle After Renovation Chorlton Cum Hardy Rental Property

When I had finished sealing the grout, I applied new, high quality and mould resistant silicone in White to match the tile and shower tray. With that, the restoration was complete.

The whole process took less than a day and although it was hard work both myself and the landlord were very pleased with the outcome. If you didn’t know any better, you would think it was a brand-new installation.

Grubby Shower Cubicle After Renovation Chorlton Cum Hardy Rental Property


Shower Cubicle Cleaning in Greater Manchester

Grubby Tiled Shower Cubicle Renovated in in Chorlton-cum-Hardy Read More »

Old Flagstone Kitchen Floor Before After Restoration Broadbottom

Flagstone Kitchen Floor Resurfaced in Broadbottom

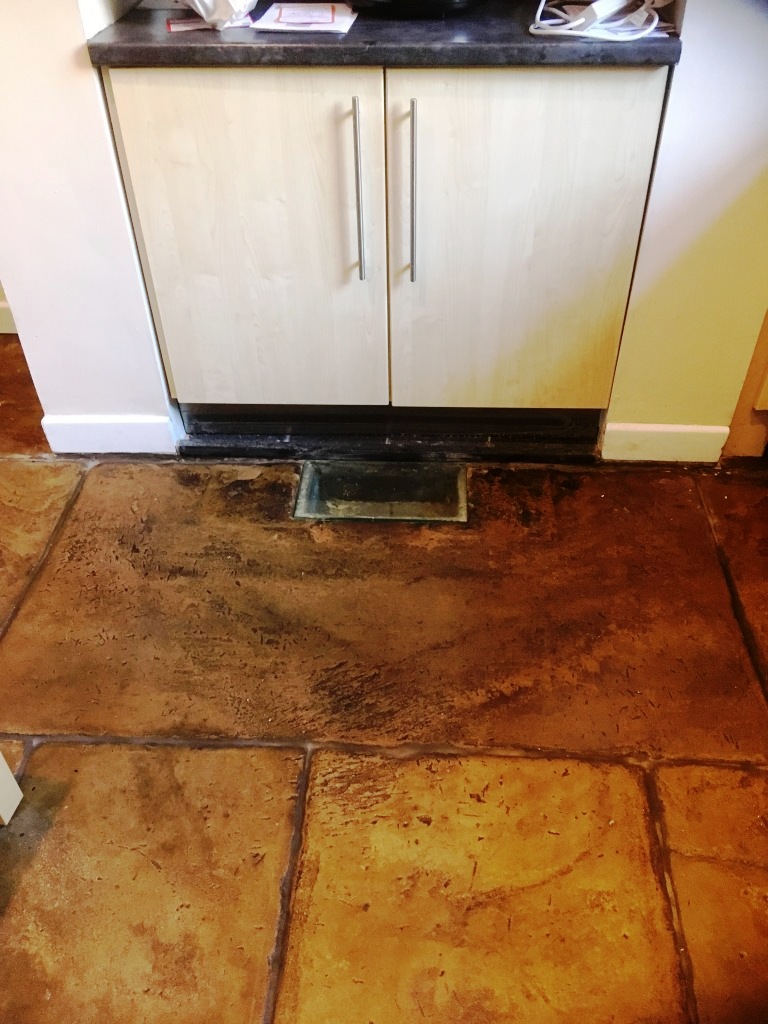
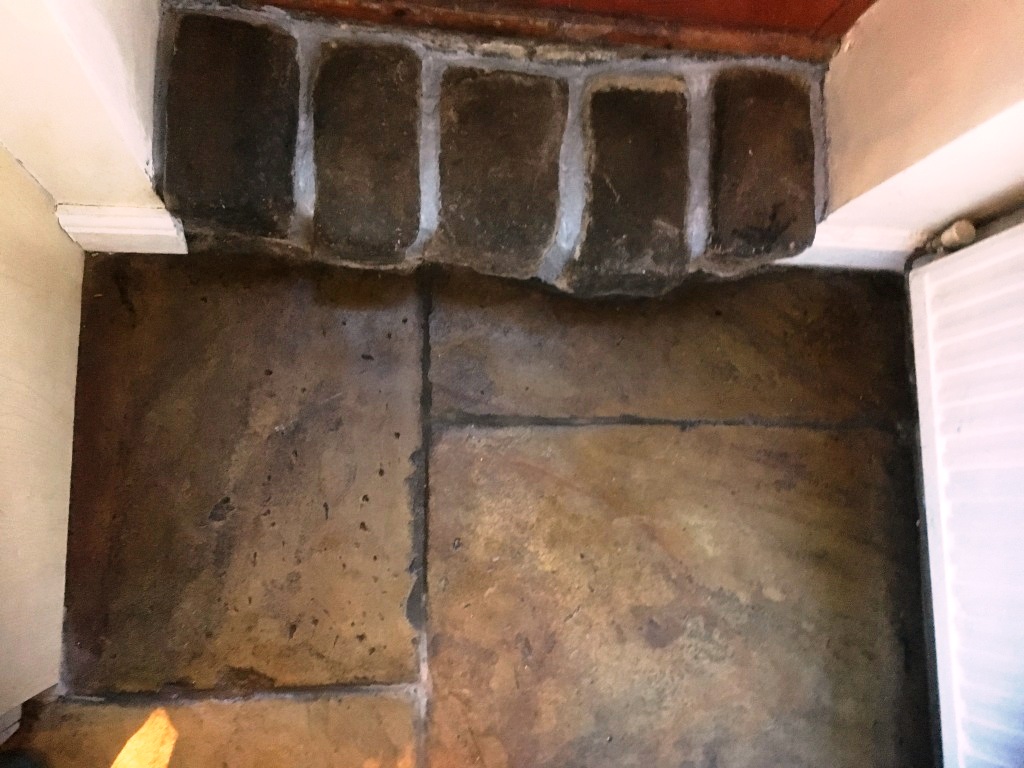
The new owners of this lovely terraced house in the village of Broadbottom that was built circa 1900, inherited with it a lovely old flagstone floor in the Kitchen which was now in a rather bad state with ingrained dirt and stains.

Old Flagstone Floor Before Cleaning Broadbottom

I suspected that the White staining was due to alkaline salts, a problem more commonly known as efflorescence. However, I took a moisture reading of the floor with a damp meter and the readings were normal, so it may have been a historic damp problem that cause it. We are always wary of efflorescence issues when it comes to older properties as damp proof membranes which resolve this problem are a relatively modern invention.

Old Flagstone Floor Before Cleaning Broadbottom

After explaining the process, I worked out a quote which was accepted and booked a date in the diary for the work to commence, which would take place over two days.

Cleaning and Grouting a Flagstone Kitchen Floor

First the floor was in a terrible state and needed to be resurfaced if it was going to live up to its potential. To do this I used a 100 followed by a 200-grit coarse Diamond milling pads to grind off the top layer of ground in dirt, resurface the stone and reveal the beautiful stone beneath. These abrasive pads are run over the floor with a weighted floor buffer running on a nice slow speed and lubricated with water. The floor is rinsed with more water after each pad and then the soil extracted using a wet vacuum.

As the floor had quite a few areas where the grout had cracked and crumbled, I decided to rake this out and replaced it with a flexible grout using a colour sympathetic to the original. This and the milling made an immediate improvement to the overall appearance of the floor. The floor was then left to dry off overnight and I came back the next day to apply a sealer.

Sealing a Flagstone Tiled Kitchen Floor

The next day I checked the floors moisture level before sealing, all was well, so I applied a couple of coats of Tile Doctor Colour Grow. This is an impregnating sealer that has a matt finish. Tile Doctor Colour Grow is also fully breathable so should cope well with any damp issues and allow moisture to rise through the stone and evaporate. This is important as otherwise moisture could become trapped under the floor where it could eventually cause problems in the walls.

Old Flagstone Floor After Sealing Broadbottom Old Flagstone Floor After Sealing Broadbottom

The customers were delighted with the outcome, the colour of the stone had really improved also Milling the surface of the floor makes it smoother so it would now be much easier for them to keep clean in future.

Old Flagstone Floor After Sealing Broadbottom

For aftercare I left them with a bottle of concentrated Tile Doctor Neutral Tile Cleaner which once diluted is a pH neutral product that will not erode the newly applied sealer. Many household cleaners are too strong for sealed floor and will prematurely erode the sealer over time.


Professional Restoration of a Flagstone Tiled Kitchen Floor in Greater Manchester

Flagstone Kitchen Floor Resurfaced in Broadbottom Read More »

Marble Tiled Floor Before After Polishing Middleton

Marble Floor Tiles Polished and Sealed in Middleton, Manchester

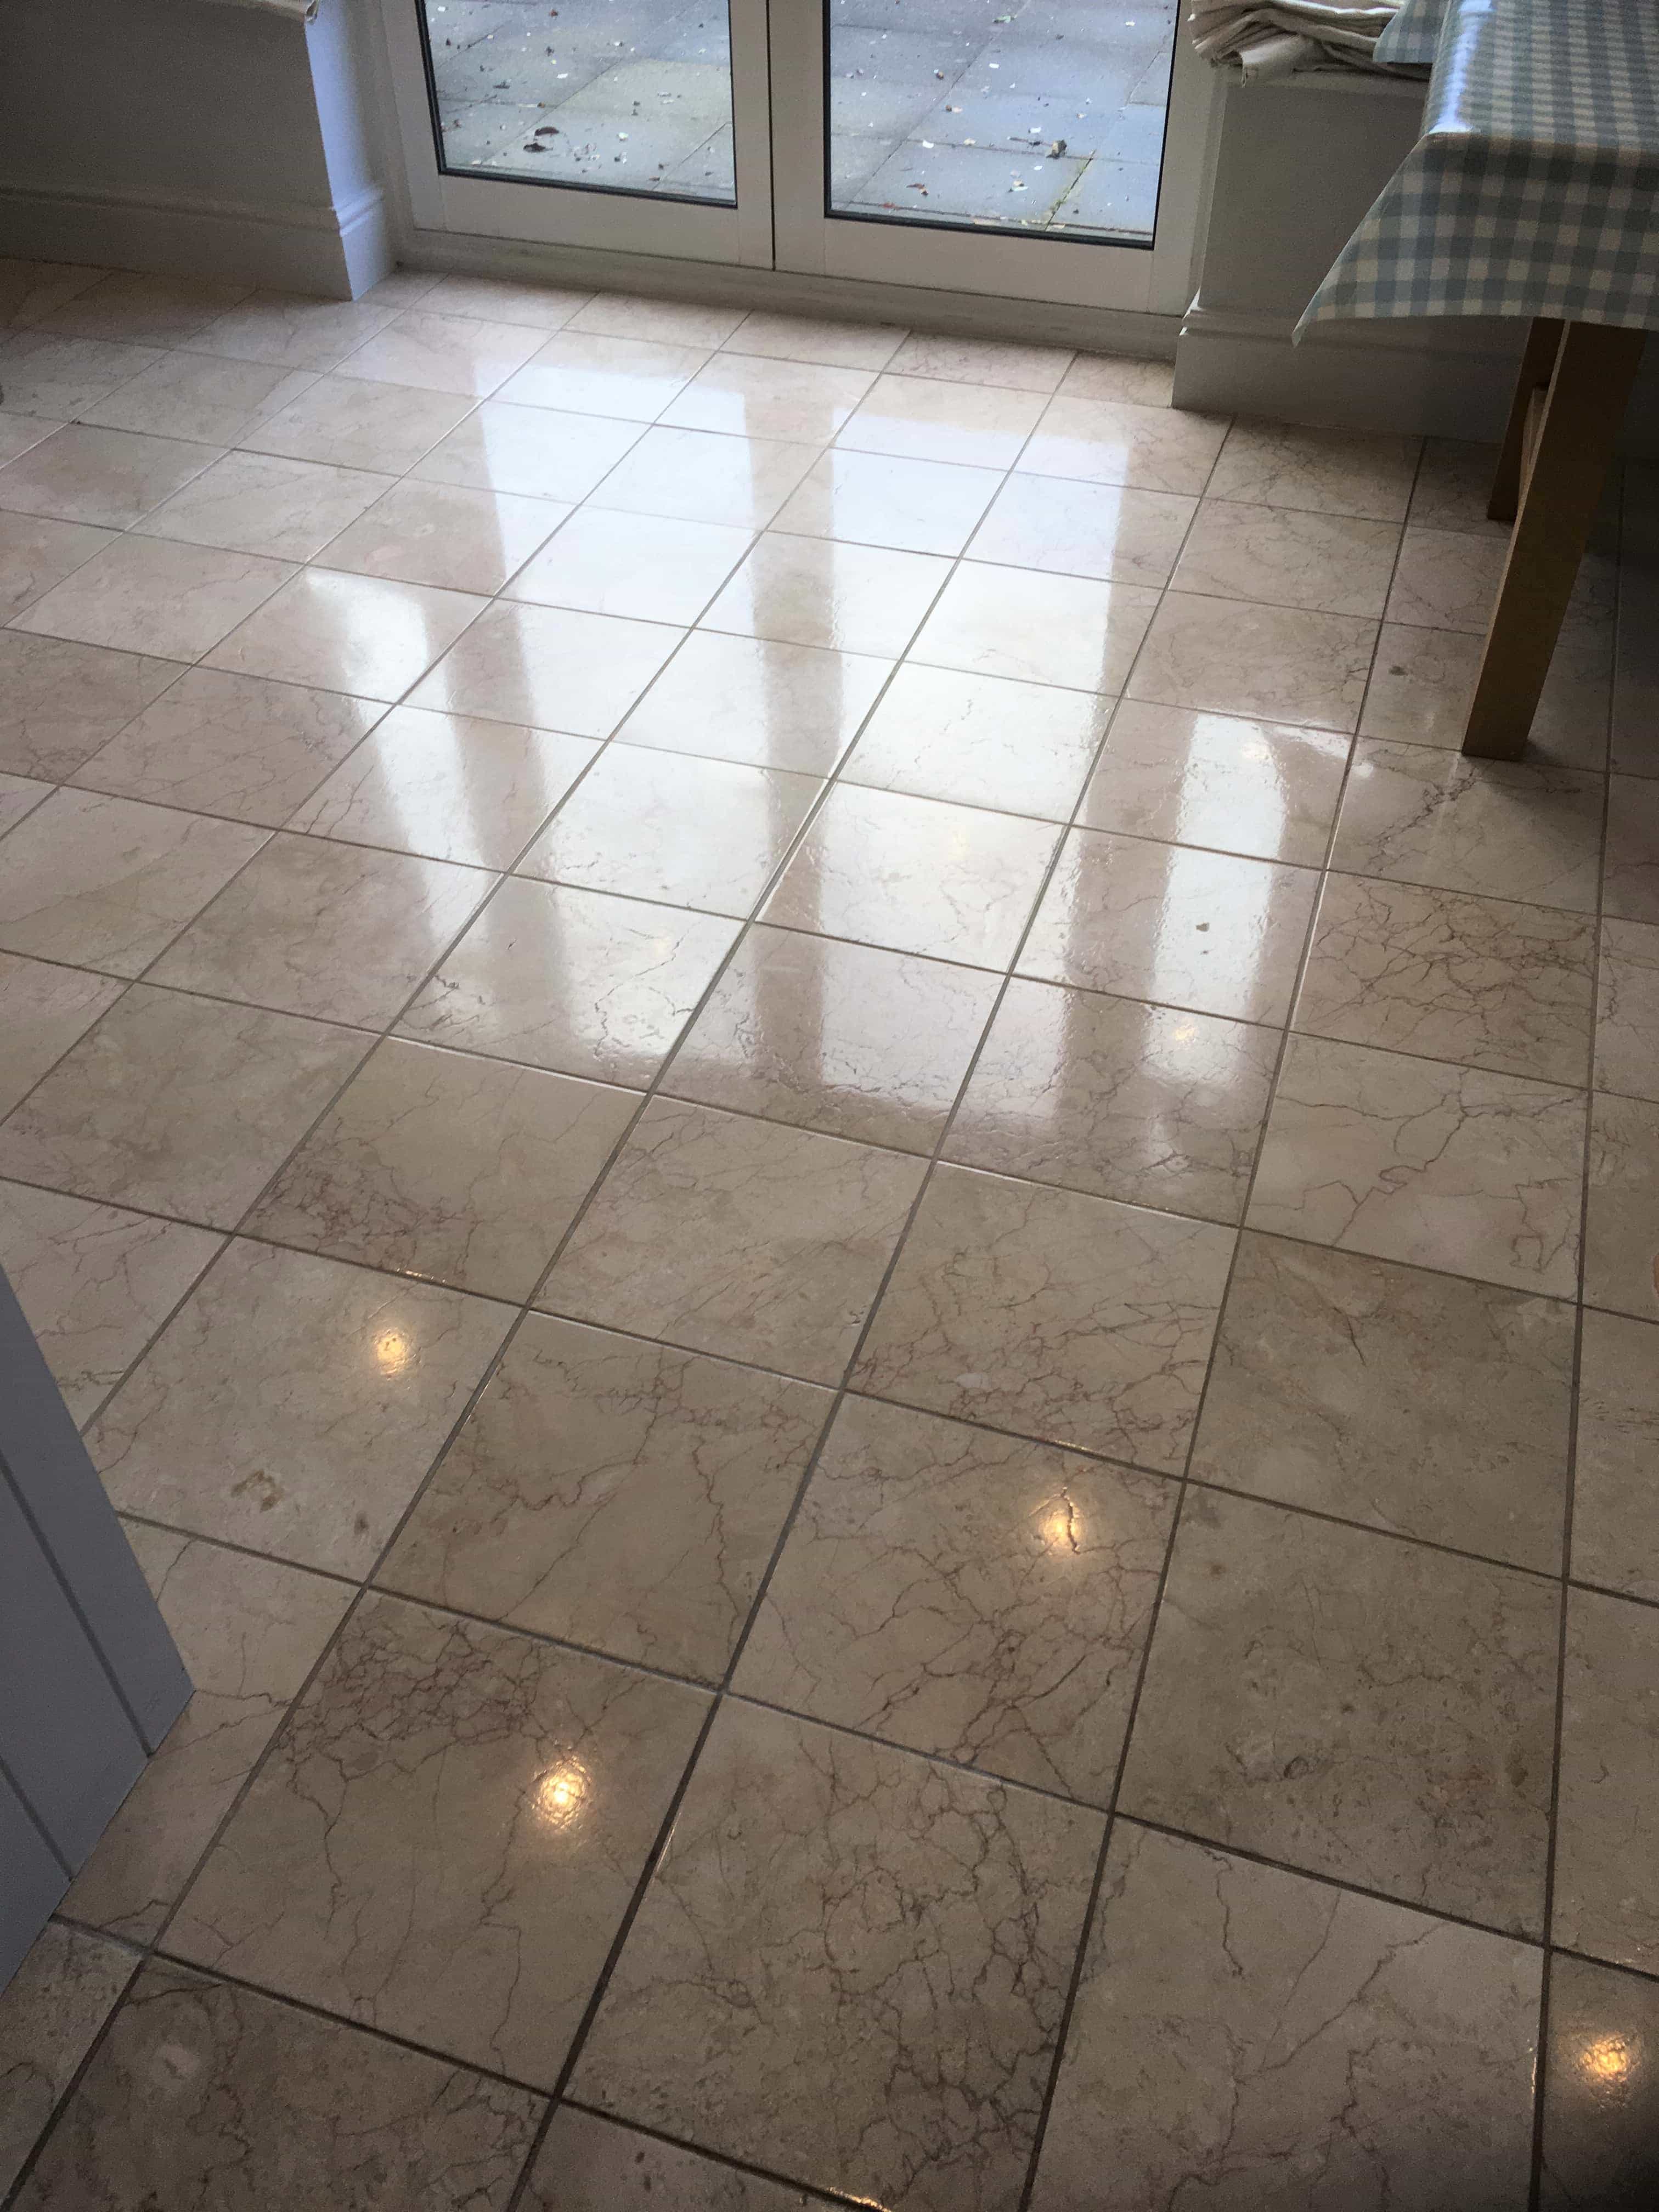
This customer in Middleton near Manchester wanted to bring the shine up on the tiled floor in their Kitchen and Dining Room, it had been laid nearly fifteen years before and was now dull, lifeless and the grout was also in need of a clean.

I was told the tiles were Ceramic however after visiting the property and running some tests if became clear that the tiles were in fact Marble. There are some very realistic Ceramic and Porcelain tiles on the market however you usually find they have a set of repeating patterns whereas with natural stone no two tiles are the same.

Marble Tiled Floor Before Polishing Middleton Manchester Marble Tiled Floor Before Polishing Middleton Manchester

The floor had lost its shine over the years which is a common problem with natural stone such as Marble which ideally needs to be polished and have the sealer topped up every year to keep it in the best condition. The cleaning test results were so good that the customer booked us in to complete the floor straight away after agreeing the quote.

Cleaning and Polishing a Marble Tiled Kitchen and Dining Room Floor

We started by giving the floor a general clean with Tile Doctor Pro-Clean paying special attention to the grout where it was scrubbed in along the grout lines using a stiff narrow brush. The soiled cleaning solution was then rinsed off and extracted using a wet vacuum.

The next step was to clean and re-polish the Marble using the 400, 800 and 1500 grit burnishing pads which re-hone the stone bringing up the polish gradually. You use water to lubricate the process and rinse with more water in-between each pad to rinse off the soil that is generated. The soil is then extracted with a wet vacuum.

After running all three pads over the floor in sequence and the floor was left to dry off overnight and I returned the next day to complete the work.

Sealing a Marble Tiled Kitchen and Dining Room Floor

On my return I started by running over the floor with the fourth burnishing pad in the set which is a very fine 3000-grit pad. It’s applied with a little water sprayed onto the floor using a technique we call a “Spray Burnish” and it really brings up the polish on the Marble tiles.

The last step was to seal the Marble tiles which will protect them from dirt becoming ingrained in the pores of the stone and make them easier to clear. For this I chose to use Tile Doctor Colour Grow which is an impregnating sealer which has the added benefit of enhancing the natural colours in the stone.

Marble Tiled Floor After Polishing Middleton Manchester Marble Tiled Floor After Polishing Middleton Manchester

It was the perfect choice for the floor and the final result was quite a transformation. Certainly my customer was very happy with the results and left the following feedback on the Tile Doctor feedback system.

“Excellent professional service. The floor tiles are back to how to how they were 14 years ago.”

Before leaving I discussed aftercare and explained that the more a polished floor gets used the more the shine and sealer wears off, so I always advise having the floor re-polished once a year using the 3000-grit pad and then adding another coat of sealer. My customer agreed and has already booked me in for a years’ time to do the work which should only take about two hours.


Professional Renovation of a Marble Tiled Floor in Greater Manchester

Marble Floor Tiles Polished and Sealed in Middleton, Manchester Read More »

Bathroom Wall Tile Before and After Renovation in Stockport

Tile and Grout Refresh for Neglected Bathroom in Stockport

If you’re a landlord, it can be quite difficult to know what your tenants are getting up to and whether they are taking good care of your property. It’s usually only when major problems emerge that a landlord will get involved.

Such was the case with a recent customer of mine who owns a property in Stockport, a large town in Greater Manchester not too far south from the main city centre. The tenants of the property either neglected or didn’t know how to take care of the tiled shower walls in the bathroom. Over time, the condition of the tiles and grout had become so appalling that the landlord had to call Tile Doctor to see about restoring them.

Bath Shower Tile Before Refresh Stockport

Cleaning Dirty Shower Tiles

I began the restoration by cleaning the grout lines, which were truly filthy. This was done using a strong solution of Tile Doctor Pro Clean. Pro-Clean is an ideal product for cleaning up neglected tiles and grout, since it removes all manner of dirt, including the soap scum and grease which had built up on these shower walls over the course of several months.

The product was left to dwell for a couple of minutes before being scrubbed deep into the grout. The area was subsequently rinsed with fresh water to remove the soil. In some stubborn places, I didn’t achieve the desired result right away, so I repeated the cleaning process a couple of times.

When the grout and tiles were cleaned to the best of my abilities, I used my heat gun to dry the walls quickly. Next, I removed all the mouldy silicone around the shower, a process which proved quite tricky because the tiles were all quite small, and there was newer silicone on top of old, very mouldy silicone, so I had to dig in deep to get it all out.

After doing this, I had to clean and dry the gap between the tiles and the bath because the old mouldy silicone didn’t leave it in a pretty state.

Sealing Shower Tiles

After everything was cleaned and dried, I sealed the walls using Tile Doctor Wall Tile and Grout Sealer Aerosol Spray. What makes this such a brilliant product is how easy it is to use. It is a spray-on sealer that adds long lasting protection against water, dirt, grease, mould and limescale. This reduces the amount of maintenance required.

When I had finished sealing the tiles and grout, I applied new, high quality and mould resistant silicone. With that, the restoration was complete. The whole process took only a day’s work, but you must agree that a fantastic outcome was achieved. The landlord and tenants were very happy with it, remarking that if they didn’t know any better, they would’ve thought it was a brand-new installation.

Bath Shower Tile After Refresh Stockport
 

Filthy Bath Tile and Grout Cleaned and Sealed in Greater Manchester

Tile and Grout Refresh for Neglected Bathroom in Stockport Read More »

Victorian Tiled Chruch Floor Before and After Renovation in Rishton

1877 Victorian Tiled Church Floor Restored in Rishton

Earlier this year I was asked to restore a number of Victorian tiled floors at the St. Peter & St. Paul’s Parish Church in Rishton near Blackburn. The Church has a lot of carpet flooring and some had to be removed due to some other work that was going on and these tiles were discovered underneath. The Vicar believe the tiles are originals and date back to 1877.

Victorian Floor Before Cleaning Rishton Church

You can see from the photograph above that the tiles were discoloured with years upon years of ingrained dirt but what you can’t see is the adhesive that was used to secure the carpet to the tile. The whole floor and the Altar behind would need several deep cleans to remove the dirt and glue and being a busy church with an active congregation it would need to be done in a few days. In need of an extra pair of hands I gave Derbyshire Tile Doctor Henri Mall a call and he was more than happy to help me out.

Victorian Floor Before Cleaning Rishton Church Victorian Floor Before Cleaning Rishton Church

Deep Cleaning Old Victorian Church Tiles

To begin, I took moisture readings over all areas due to be worked on; Damp Proof Membranes were not invented until relatively recently, so it pays to know in advance how damp the floor is. Next, I gave the floor a quick clean in Tile Doctor Pro-Clean, mainly to remove any surface dirt and grit. This was then followed by the application of a 200 grit burnishing pad to grind off surface dirt and excess glue so we access the pores of the tile. The resultant soil was then rinsed off with water and then extracted using a wet vacuum.

The next step was to give the tiles a good soak in a solution of NanoTech HBU remover (HBU stands for Heavy Build-Up) which was then scrubbed in using a black pad fitted to a rotary floor machine. This process worked well to release the ingrained dirt from the tile and took off a lot of the glue however it took quite a few iterations and the use of a portable steamer to really get the floor clean.

Victorian Floor During Cleaning Rishton Church Victorian Floor During Cleaning Rishton Church

There was a lot of tile to do so working in sections it took Henri and I two days to really get the floor clean. A lot of water was used in the process and although a lot of the moisture was extracted using a wet vacuum we felt it best to leave the floor to thoroughly dry out for a couple of days.

Sealing Old Victorian Church Tiles

The floor needed to be dry before sealing so on our return I checked the floor with the damp meter and compared it with my previous readings. All was so Henri and I started applying the first coat of Tile Doctor Colour Grow, an impregnating and breathable sealer ideal for this situation. Colour Grow seeps into the pores of the tile protecting it from within and enhancing the colours in the tile. Three coats were needed so it took most of the day to complete.

Victorian Floor After Cleaning Rishton Church Victorian Floor After Cleaning Rishton Church

While it was a lot of work we were very both pleased with the outcome, as was the Vicar who left the following comment on the Tile Doctor feedback system.

Many thanks to Tony Olmet, not only a very good job but he worked tirelessly, never stopped, to get it done. Nothing a problem, very helpful chap. Recommended.
Christopher Holden (vicar), Rishton 14 July 2017

Victorian Floor After Cleaning Rishton Church


140 Year Old Victorian Tiled Church Floors Restored in the Diocese of Blackburn

1877 Victorian Tiled Church Floor Restored in Rishton Read More »
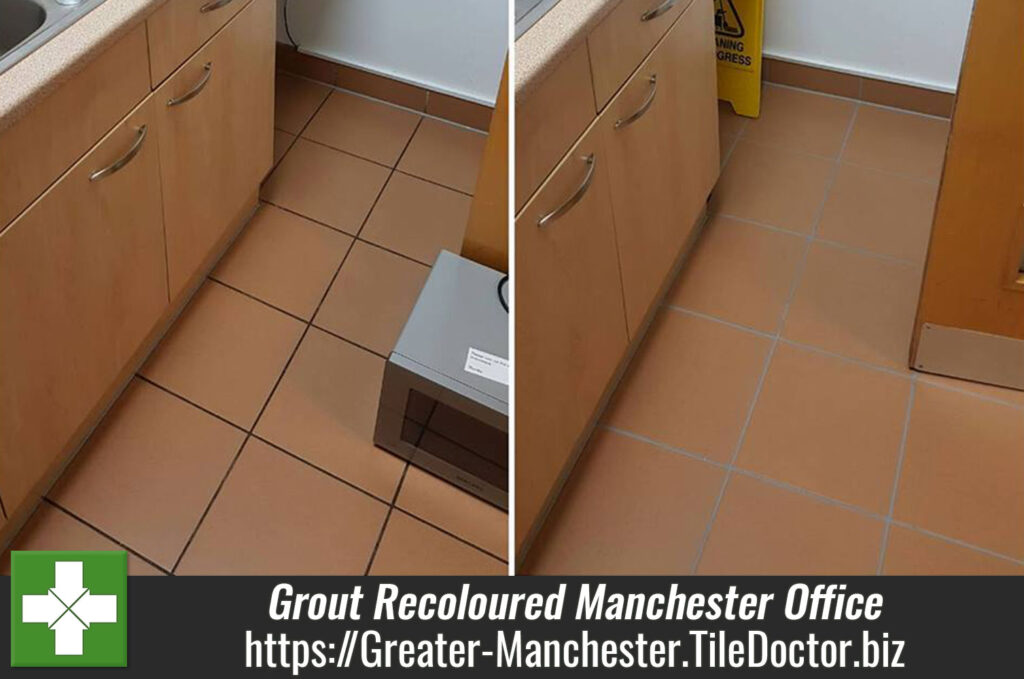
Grout Cleaned and Recoloured in Manchester Office Toilets and Kitchens

Grout Cleaned and Recoloured in Manchester Office Toilets and Kitchens

We recently received a request from the Manchester headquarters of a global engineering and construction company which was founded in 1911 and now operates in over 160 countries. The company contacted us because they were keen to restore the tiled walls and floors in 20 different toilets and kitchens throughout the offices.

It would be a big job, but we were more than happy to respond to the enquiry. We agreed a complimentary visit to the office for us to test clean one of the floors to show what kind of results could be achieved. The management team at the offices was very impressed with the results of the test clean and asked us to complete the whole job.

Toilet Floor at Corporate Offices Manchester Before Cleaning
There was talk of replacing some of the grout completely and I explained that it would be less expensive and time consuming to restore the discoloured grout through cleaning and recolouring and they were happy to let us proceed on that basis.

Mens Toilet Floor at Corporate Offices Before Cleaning

Cleaning Discoloured Grout Lines

As there were 20 different rooms to clean and recolour, our team worked in a couple of rooms at a time to ensure firstly, that we got the job done in time and secondly, that we wouldn’t disturb the normal operations of the offices.

The process was as follows. To clean the grout, we used a strong mix of Tile Doctor Pro Clean, a strong Alkaline-based cleaner which reliably gets the job done in situations where most run-of-the-mill cleaners won’t. We applied the Pro Clean to the grout lines and tiles and left it to dwell for about 10 minutes. We then scrubbed the grout lines with specially designed grout brushes and followed by cleaning the tiles with a black scrubbing pad fitted to our rotary machine.

Ladies Toilet Floor at Corporate Offices During Cleaning
After scrubbing the tiles and grout, we rinsed and removed all the dirty water and cleaning solution with a wet vacuum. We repeated the rinsing process several times to make sure all chemicals were neutralised. Similar cleaning techniques were used to clean the tiles on the walls, but the walls took a lot longer to complete as the tiles were much smaller and therefore had a greater number of grout lines. When all the cleaning process was finished, we left the tiles to dry until the next day.

Toilet Floor at Corporate Offices Manchester After Cleaning

Recolouring the Wall and Floor Grout Lines

To recolour the grout lines, we used the Grout Colourant from Tile Doctor’s own range. Available in ten different colours, this is a brilliant product as it rejuvenates and also seals the grout. The fact that the colourant is epoxy based will also make future maintenance easier, as you can just wipe off the dirt.

Toilet Floor Grout During Recolouring at Corporate Offices Manchester Toilet Floor at Corporate Offices Manchester After Grout Colouring

For the floor grout lines, we used the Natural Grey colourant and for walls we used White. The application of the colourant is simple yet quite laborious when working in large rooms. After finishing, we wiped off any excess product.

Kitchen Floor at corporate offices Before and After Cleaning
Overall, it took us two weeks to complete all the work but I think you will agree from the photographs that all toilets and kitchens look completely rejuvenated. We got lots of good feedback from the people who work at the company. They all stated that the toilets and kitchen look like new and even asked us about restoring grout in their own homes.

Commercial Toilets and Kitchen Grout Restoration at International HQ Manchester

Grout Cleaned and Recoloured in Manchester Office Toilets and Kitchens Read More »

Ceramic Tiled Shower Cubicle Before and After Refresh Moston

Removing Mould from a Ceramic Tiled Shower Cubicle in Moston

The photographs below are from the bathroom of a house in the Moston area of Manchester which is primarily residential and only 3 miles away from the city centre. My customer had been primarily concerned with the removal of unsightly mould but was also keen to have the grout in the ceramic tiled shower cubicle given a good deep clean.

Ceramic Tiled Shower Cubicle Before Restoration Moston Ceramic Tiled Shower Cubicle Before Restoration Moston

Cleaning a Ceramic Tiled Shower Cubicle

To clean the Shower Cubicle, I used a strong dilution of Tile Doctor Pro Clean which is a strong alkaline cleaner that works really well on grout. The Pro-Clean solution was decanted into a spray bottle and then sprayed onto the grout lines and left it to dwell. The air in the solution makes it lighter and easier for it to stick to vertical surfaces.

After a few minutes the Pro-Clean was scrubbed in using a stiff grout brush. The tiles were then rinsed with water to remove the soiled solution from the tiles and the process repeated where required.

Although cleaning process was a success there were still a few mould marks left so to tackle these I used Tile Doctor Mould Away spray using the same process of scrubbing and rinsing. The Mould Away spray did the trick for me and I moved on to remove the silicone around the shower cubicle. When removing silicone, you must make sure you get all mouldy silicone out otherwise it can spread from the old to the new.

Ceramic Tiled Shower Cubicle During Restoration Moston

After I had finished removing the silicone I tidied the shower cubicle and used a bit of gentle heat from my heat gun to dry the grout lines and edges where silicone used to be.

Grout Colouring a Ceramic Tiled Shower Cubicle

I used my damp tester to make ensure there was no dampness anywhere around the working area and then moved on to colouring the grout which would give the whole shower a fresh and consistent appearance. On this occasion, I used a White colour from the Tile Doctor range of Grout Colourant’s, it’s an epoxy based colourant that protects and rejuvenate the grout lines.

I had to use 2 coats of colourant to get the best result and then moved on to putting new silicone around the shower base with a high-quality mould resistant silicone. When finished adding fresh silicone I tidied up again and the job was complete.

Ceramic Tiled Shower Cubicle After Restoration Moston Ceramic Tiled Shower After Restoration Moston

I think you can’t argue the shower cubicle was transformed and customer even said it looks better then when it was new; we also fixed few chips for her whilst there and stripped and replaced the silicone around the sink as a bonus.

Ceramic Tiled Sink Grout Before Cleaning Moston Ceramic Tiled Sink After Cleaning Moston


Shower Tile Refresh in Greater Manchester

Removing Mould from a Ceramic Tiled Shower Cubicle in Moston Read More »

Renovating Travertine Shower Cubicle in Newton Heath

Cleaning a Travertine Tiled Shower Cubicle in Newton Heath

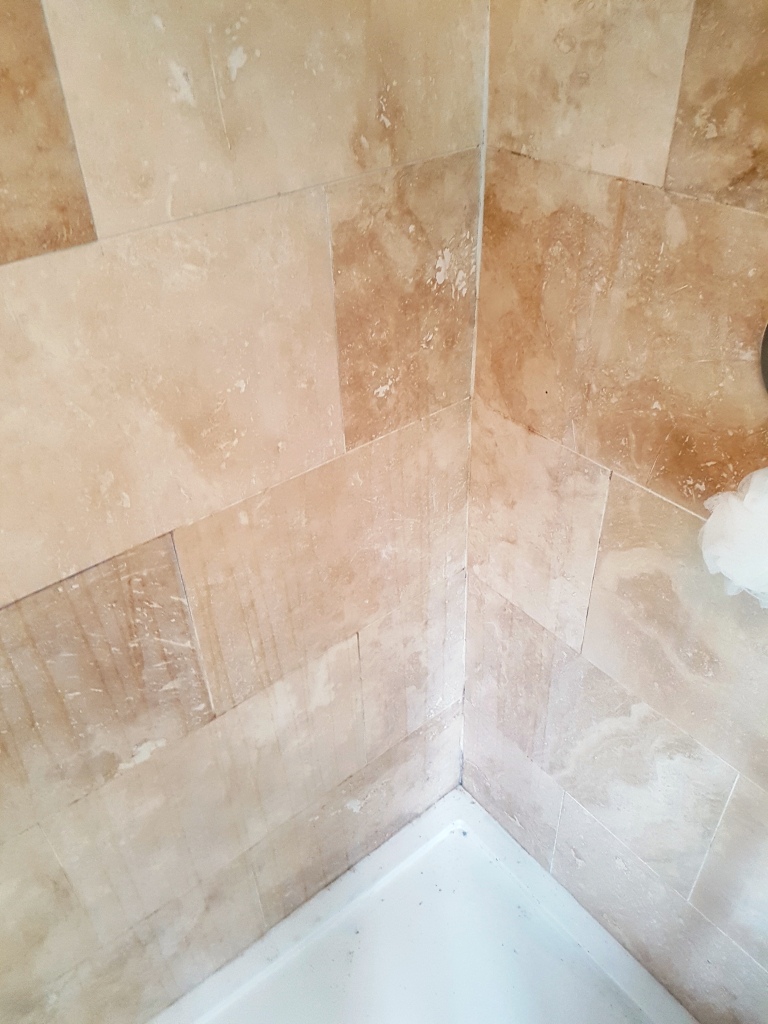
This is a follow-up post from last week where I detailed the restoration of a beautiful polished travertine floor that had been installed on most of the ground floor and bathroom at a property in Newton Heath. After cleaning, polishing and sealing the floor tiles the owners asked if I could apply the same treatment to their Travertine tiled shower cubicle which was not looking its best and had become stained over time.

Travertine Shower Before Cleaning Newton Heath

Cleaning Travertine Shower Wall Tiles

First I successfully cleaned the grout with a medium dilution of Tile Doctor Pro-Clean scrubbed into the wall grout with a special stiff grout brush, the tiles were then rinsed with water and the process repeated until I was satisfied with the result.

Travertine Shower Before Cleaning Newton Heath

To clean the Travertine wall tiles I used the same Diamond pad system as I did on floor, starting from 400 grit and moving up to 3000 grit pads lubricated with a little water, the only difference this time was that I used smaller six inch pads fitter to a hand held burnishing machine.

Sealing Travertine Shower Wall Tiles

After I completed all the cleaning and the tiles had dried I proceeded to seal them with Tile Doctor Colour Grow sealer, this is the same sealer that I used on the floor and the excess was polished off with cotton cloths.

The last remaining step was to strip out the silicone sealant strip from around the base of the shower cubicle and replace with new. I used high quality anti mould silicone sealant that left nice lines and fresh look.

Travertine Shower After Cleaning Newton Heath

Needless to say, that customer was very happy with the work carried out on the floor and shower cubicle and recommended me to his neighbour straight away.

Travertine Tiled Shower Cubicle Refreshed in Greater Manchester

Cleaning a Travertine Tiled Shower Cubicle in Newton Heath Read More »

Renovating Dull Travertine Tiles in Newton Heath

Cleaning, Polishing and Sealing Travertine Floors in Newton Heath

This customer in Newton Heath, just outside of Manchester, used to have a beautiful polished travertine floor on most of the ground floor and bathroom but over time it was getting duller and duller as the polish became worn down, not helped I might add by their choice of cleaning products which were not appropriate for this type of floor. Additionally, numerous cracks and holes had appeared in their floor and worried it was going to get worse they decided to call in some professional help and get the whole floor fully restored.

Travertine Tiled Floor Before Cleaning and Sealing Newton Heath

When I got the call I went over to the house to take a in-depth look at the problem and recommended that the floor was burnished using diamond pads of different grades. They also asked if I could apply the same treatment to the travertine bathroom floor and shower cubicle as well, which I was very happy to do so we agreed a price and scheduled a date to do the work.

Travertine Kitchen Floor Before Cleaning and Sealing Newton Heath

Dull Travertine Floor Cleaning/Polishing

To start the burnishing process, I applied the Coarse 400 grit burnishing pad to the floor using rotary machine and water as lubrication to break down and remove any old sealer from the stone. When finished with first burnishing pad I removed all the soiled water left on floor with a wet vacuum. This removal process of soiled residue was repeated after each use of a burnishing pad.

Next, I moved on to the Medium 800 grit pad which is less coarse, but still rough enough to break down layers of ingrained dirt. I followed this up with the application of a Fine 1500 grit pad, which started to smooth down the rough areas of the surface to prepare the floor for a final polish with 3000 grit. However before moving straight on to the final of the four pads, I took the time to carefully fill in the all the small cracks and holes in the stone, before leaving the floor to dry until the next day.

Sealing Travertine Floor

The next morning, I returned to the property to finish off the floor restoration. As soon as I arrived I used a damp tester to make sure the floor was completely dry.

All was well so I went over the floor with the final Very Fine 3000 grit burnishing pad, this time without any water lubricant, to finally achieve a high quality polished finish.

For polished floors, we recommend the use an impregnating sealer that penetrates the pores of the stone rather than sitting on the surface of the floor, as this ensures the quality of the polish isn’t damaged. With this in mind I applied Tile Doctor Colour Grow to seal the tiles. This is a colour enhancing sealer that provides durable surface protection and allows the surface to breathe whilst enhancing the natural colours in the stone. At this point it’s important that any sealer that doesn’t penetrate the stone is removed by polishing it off with a cloth.

Travertine Tiled Floor After Cleaning and sealing Newton Heath

After this I went on to repeat the cleaning, polishing and sealing process on their Travertine Tiled shower cubicle but I’ll detail that in a separate post.

Needless to say, the customer was very happy with the work carried out on the floor and shower cubicle and recommended me to his neighbour straight away.

Travertine Bathroom Floor After Cleaning and sealing Newton Heath


Professional Travertine Tile Restoration in Greater Manchester

Cleaning, Polishing and Sealing Travertine Floors in Newton Heath Read More »

Scroll to Top