Grout Cleaning

Welcome to my Work History archive where you will find detailed examples of the cleaning and renovation of Grout carried out in Greater Manchester

Cleaning and Renovating Grout

The top layer of grout is porous and can absorb grease, dirt and limescale. Spillages such as wine, lemonades or greasy substances will cause marks and patches in the joints in the floor. Grout between wall-tiles particularly in damp areas like bathrooms will become dirty and unattractive as a result of Mould, Mildew and Limescale.

Mould is one of the most unsightly problems, which usually starts off in the wettest area of the room, this could be the bottom of the shower or bath, then starts to spread and if left unchecked could cover a large area of the wall.

Another common issue we find is a problem known as Grout Haze or Grout Smearing where a thin layer of grout has been left to set on the surface of the tile. Once grout has set it is difficult to remove.

Discolouration of grout joints in bath or shower areas due to continued use of acid formulated shampoos and soaps. This causes yellow orange and pink stains to the grout over even a short period of time. Whilst Grout Joints can be cleaned, badly stained grout may need to be re-coloured.

Protecting your grout in advance with a sealer will prevent most of these issues and although relatively unknown in the UK, protection awareness is growing. Sealing forms an invisible barrier between the grout and the surface, this will then protect your investment for years to come.

We have solutions for all the problems listed above and below you will find detailed examples of work we have carried out in the past to resolve many of these issues. It should give you some idea of what’s involved and what can be achieved with the right techniques and products.


Shower Cubicle Before After Renovation Chorlton-cum-Hardy

Grubby Tiled Shower Cubicle Renovated in in Chorlton-cum-Hardy

Shower Tile and Grout renovation is a speciality of ours and has made us popular with landlords who understand properties are easier to rent when the bathrooms look fresh. This was the case with this shower cubicle at a rental property in Chorlton-cum-Hardy which is a popular suburb of Manchester south of Old Trafford.

Grubby Shower Cubicle Before Renovation Chorlton Cum Hardy Rental Property

The shower cubicle was in quite a state and well overdue a deep clean. You can see from the photographs that the shower tray was very dirty, the white ceramic wall tiles were grubby, the white grout had gone black and the silicone sealant had darkened with mould.

Grubby Shower Cubicle Before Renovation Chorlton Cum Hardy Rental Property

Cleaning a Grubby Shower Cubicle in Chorlton

Working in sections from top to bottom I began the cleaning process by treating the tile and grout with Tile Doctor Duo-Clean which a double action cleaning product. Duo-Clean is a recent addition to the Tile Doctor range and combines the properties of an effective tile and grout cleaner with a mould remover. It cleans and can remove mould and blackspot from grout and silicone, so an ideal product for cleaning up neglected shower cubicles.

The spray attachment mixes the product with air making it light and allowing it to easily stick to vertical surfaces where it can get to work breaking down dirt and mould. It was sprayed onto the wall tile and grout and then left to dwell for five minutes before being scrubbed in with a stiff brush. The area was subsequently rinsed with water to remove the soil. In some stubborn places, I didn’t achieve the desired result right away, so I repeated the cleaning process a couple of times before moving onto the next section. I can tell you a lot of elbow grease was expended on this particular cubicle, I even cleaned up the shower tray which had gone green with an accumulation of soap scum.

When the tile and grout was cleaned to the best of my abilities, I used a heat gun to dry the walls quickly. Next, I removed all the mouldy silicone around the shower tray with a sharp knife and then further dried the area.

Sealing Shower Grout

After everything was cleaned and dried, I sealed the grout using Tile Doctor Wall Tile and Grout Sealer Aerosol Spray. The tiles were glazed ceramic so won’t accept a sealer however the top layer of grout is porous which makes it vulnerable to dirt, grease, mould and limescale. Sealing will therefore ensure it keeps its appearance for longer and reduce the need for regular maintenance. Being a spray on sealer it’s very easy to apply, all you have to do is wipe it off the excess sealer from the adjacent tile afterwards.

Grubby Shower Cubicle After Renovation Chorlton Cum Hardy Rental Property

When I had finished sealing the grout, I applied new, high quality and mould resistant silicone in White to match the tile and shower tray. With that, the restoration was complete.

The whole process took less than a day and although it was hard work both myself and the landlord were very pleased with the outcome. If you didn’t know any better, you would think it was a brand-new installation.
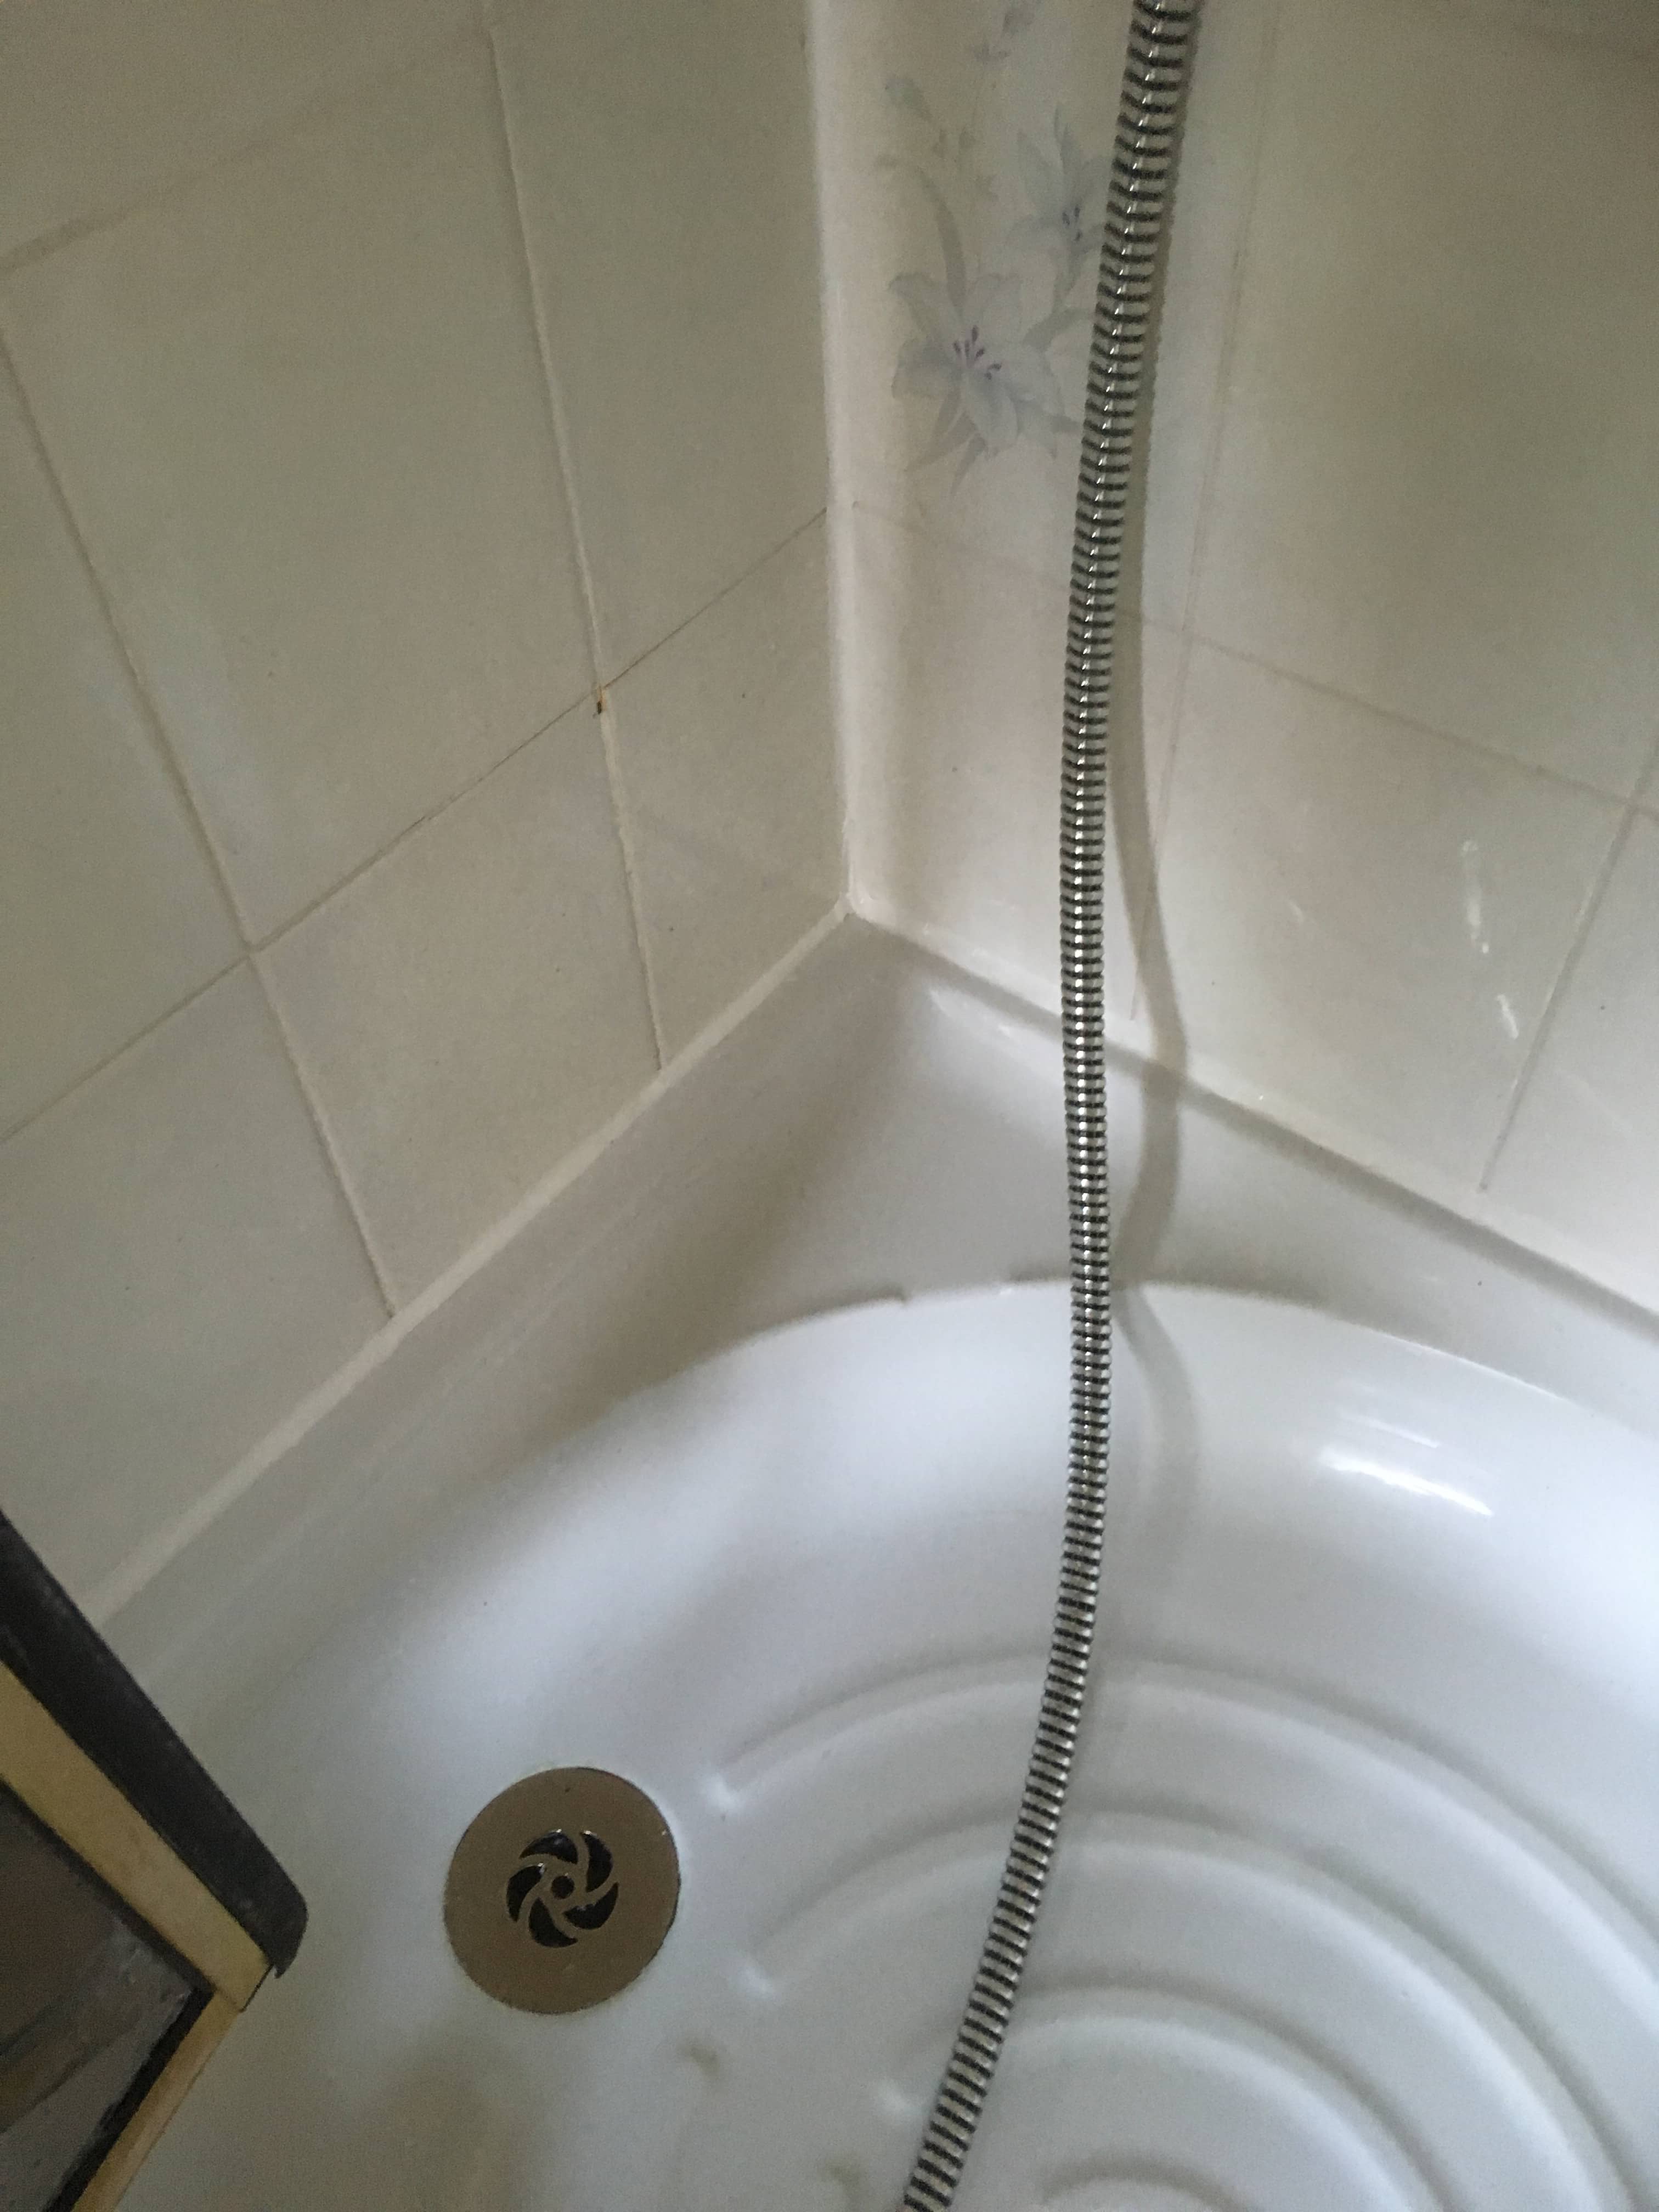
Grubby Shower Cubicle After Renovation Chorlton Cum Hardy Rental Property


Shower Cubicle Cleaning in Greater Manchester

Grubby Tiled Shower Cubicle Renovated in in Chorlton-cum-Hardy Read More »

Ceramic Tile Grout Bathroom Before and After Grout Colouring Manchester

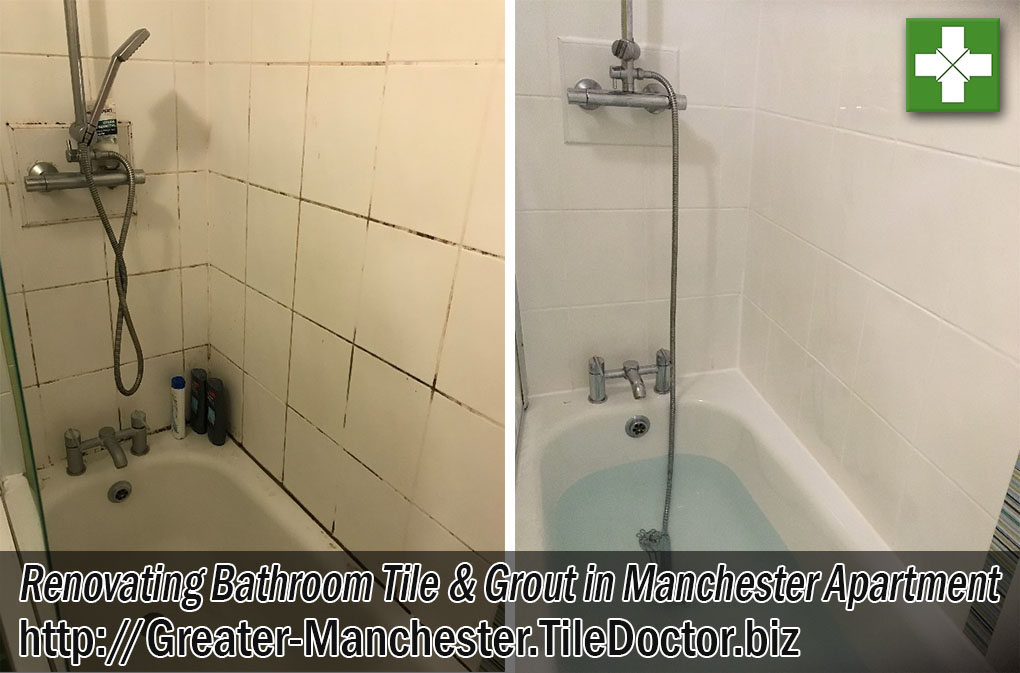
Bathroom Tile and Grout Refresh in Manchester City Rental Apartment

A client with a high-rise apartment in Manchester city centre contacted us in relation to the look of their bathroom tiles. The grout had become grubby and black with mould and it was clear from their message that they were considering have the grout replaced in order to freshen up the bathroom.

We discussed the problem over the telephone, and they emailed a picture of the bathroom across so I could get a better idea of what needed doing. It turns out that the apartment had been rented out previously and they needed the bathroom renovating so they could start letting it again. Clearly, they were keen to have the work completed as soon as possible. Fortunately, we are sometimes able to come out on short notice, especially for small jobs like this and so were able to do the work the following week

Manchester Rental Apartment Bathroom Before Grout Colouring

Re-grouting is a lot of work and very time consuming so I explained the benefits of Grout Colouring which is much quicker and results in a more practical finish as I will explain. There was a small issue with parking as one would expect from the city centre, but we were able to use one of the parking spaces of a neighbour in the basement of the building.

Cleaning the Grout and Tiles in a Ceramic Tiled Bathroom

My first task was to get the grout as clean as possible before applying the colourant and given the amount of mould I decided to apply Tile Doctor Duo-Clean which is a Tile Cleaner/Mould Remover and ideal for use on ceramic tile and grout. The product was sprayed onto the tiles and grout and then scrubbed in by hand to get the grout as clean as possible. I also used a powerful steam cleaner to get the grout as clean as possible before rinsing the soil off with water. This process went well, and the grout looked much cleaner afterwards but was now a little patchy in places due to deep staining.

It’s worth noting that mould thrives in damp warm conditions and can easily be controlled by ensuring the bathroom has adequate ventilation. Some modern showers have a function that cool the bathroom down after use by running the shower on a cold setting. Improving cross-ventilation by leaving the bathroom door and a window open can also improve the situation and of course you can always apply Tile Doctor Duo-Clean on a regular basis.

Recolouring Grout in a Ceramic Tiled Bathroom

Once the grout was dry and as clean as it could be, I applied a White Tile Doctor Grout Colourant along the grout lines with a small brush taking care to wipe off any excess from the tiles as I went. Only one bottle of colourant was needed, and I have found baby wipes work well when wiping off the excess.

The last step in the bathroom renovation was to strip out all the old mouldy silicone between the bath and the tiles and replace with new mould resistant silicone.

The cleaning and grout colour completely transformed the look of the bathroom leaving it looking fresh. The grout which was previously dark and patchy was now a consistent white colour giving the impression it had only been recently tiled. The colourant also forms an epoxy barrier over the grout that will prevent dirt from becoming ingrained in the grouts surface going forward, it’s also much easier to clean.

Manchester Rental Apartment Bathroom After Grout Colouring

The customer was most impressed with the result and has informed us since that they will back in touch about renovating the grout in their own home! They left the following comment on the Tile Doctor website.

“Kamila made a wonderful job cleaning my grout and silicone. The bathroom looks like new. She was also easy to deal, very friendly and professional. Thank you!”


Professional Bathroom Tile and Grout Refresh in Manchester Apartment

Bathroom Tile and Grout Refresh in Manchester City Rental Apartment Read More »

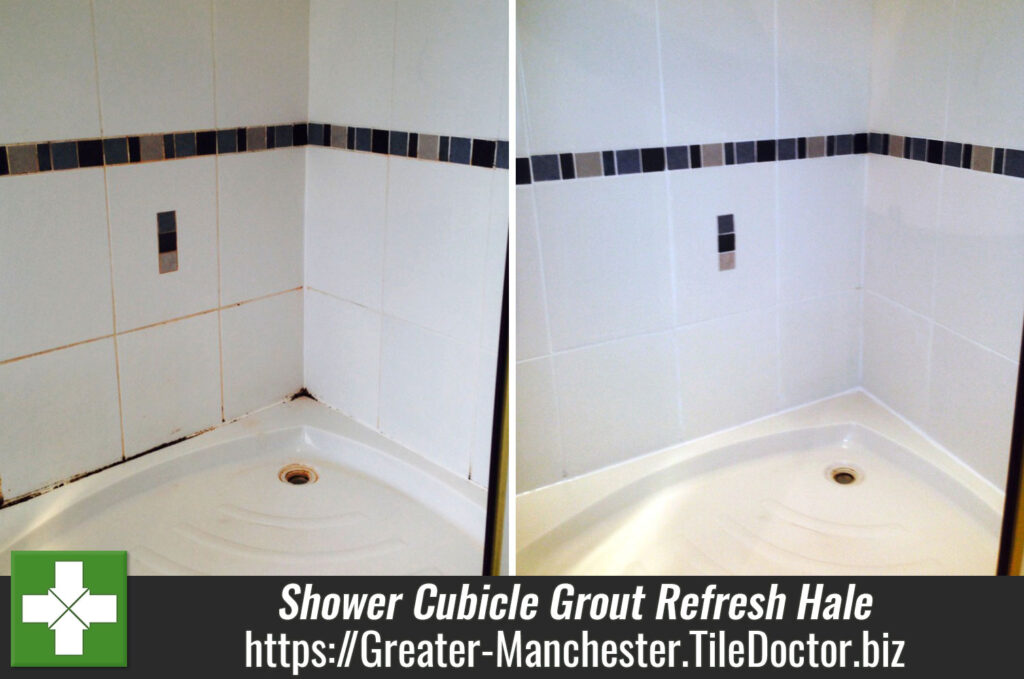
Shower Cubicle Tile and Grout Refresh in Hale

Shower Cubicle Tile and Grout Refresh in Hale

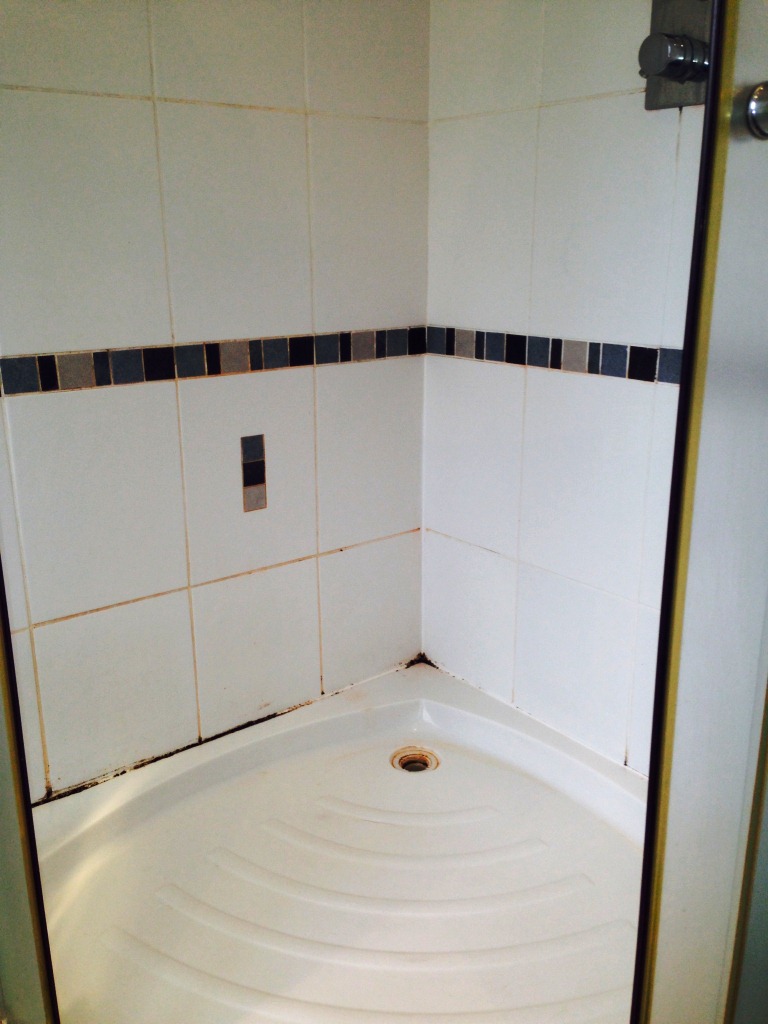
This Ceramic Tiled shower cubicle in a house in Hale was overdue a deep clean, the Ceramic Tiles were in reasonable condition but the grout lines had discoloured and become stained from the dyes in shampoo’s and soaps and the silicone needed to be replaced.

Shower Refresh Hale Before Cleaning 1

Cleaning Shower Tile and Grout

To clean the grout I decanted a strong 2:1 dilution of Tile Doctor Pro-Clean into a spray bottle and sprayed the solution on the tile and grout working in small sections. I think I’ve mentioned this before but in case you were wondering mixing the cleaner with air makes it lighter and allows it to stick onto vertical surfaces better. The solution was then worked in using a stiff scrubbing brush by hand before being rinsed off with water; this process was repeated until all the tile and grout was clean and then left to dry. If you’re doing this work yourself then you should know that Tile Doctor produces a product that comes with a spray attachment called Oxy Pro that is ready to use and can save you some time.

The next step was to take a sharp knife and remove and replace the silicone strip between the tile and the shower tray.

Grout Colouring

Although the grout was cleaner following the scrubbing it was still showing some staining so to improve it further a white Grout Colourant was applied, fortunately the tiles were large format and the grout lines minimal. The product we use is epoxy based and forms a thin impermeable barrier over the grout so not only does it look good it protects the grout as well; it’s very easily applied using a small brush along the grout lines and you just wipe of the excess so it wasn’t long before the grout was looking like new.

I think you will agree from the photographs the finished result looks like a new installation, certainly my customer was very pleased with job I had done.

Shower Refresh Hale After Cleaning 2


Refreshing a Ceramic Tiled Shower in Hale

Shower Cubicle Tile and Grout Refresh in Hale Read More »

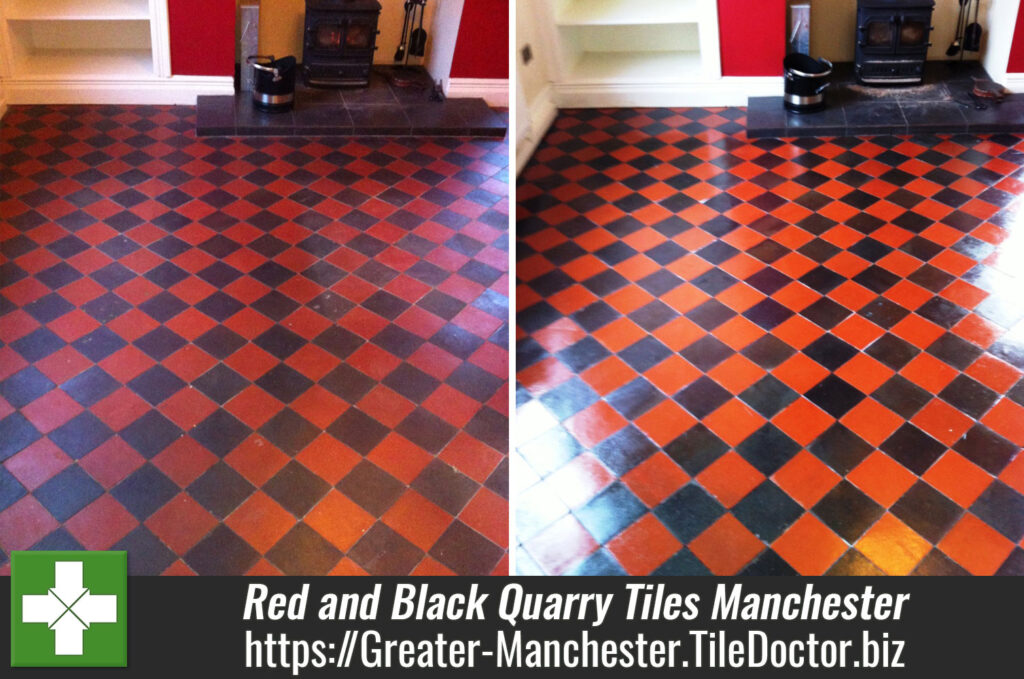
Red and Black Quarry Tiles Restored in Manchester

Red and Black Quarry Tiles Restored in Manchester

This Quarry tiled floor had been discovered under a carpet at a house in Manchester and the owner was keen to have it restored as an original period feature. The carpet had been stuck to the tiled floor using adhesive so glue was evident on the surface of the Quarry tile as were small spots of paint.

Cleaning the Quarry Tiled Floor

I started cleaning the Quarry Tiles with a strong solution of Tile Doctor Pro-Clean worked into the floor using a buffing machine fitted with a black scrubbing pad. This good job cleaning the floor however there was still evidence of adhesive and paint on the floor; a stronger product was needed so I applied Tile Doctor Remove and Go which is an acid based product so you have to be very careful not to leave it on the floor for a long time. Once the floor was clean of glue and paint it was washed down three times using clean water in order to neutralise the floor and remove any remaining cleaning products before sealing. By the way to remove liquids from floors I highly recommend the use of a wet vacuum as it makes the job much faster.

Red-and-Black-Quarry-Tiles-Before

Sealing Quarry Floor Tiles

The floor was left to dry overnight and I came back the next day to apply the sealer. For sealing the Quarry tiles I used five coats of Tile Doctor Seal and Go, it’s recommended for Quarry tiles and adds a nice low sheen to the floor; sealing does take time as it’s necessary to allow each coat to dry before applying the next so it took most of the day to complete the job. My customer was pleased with the results and left the following comment:

Friendly and helpful. The floor looks lovely – paint and carpet glue gone, nice and shiny!!
Mrs. & Mrs. C. Tower, Manchester

Red-and-Black-Quarry-Tiles-After


Removing Adhesive from a Manchester Quarry Tiled Floor

Red and Black Quarry Tiles Restored in Manchester Read More »

Victorian Floor Tile Cleaning

Victorian Floor Tile Cleaning

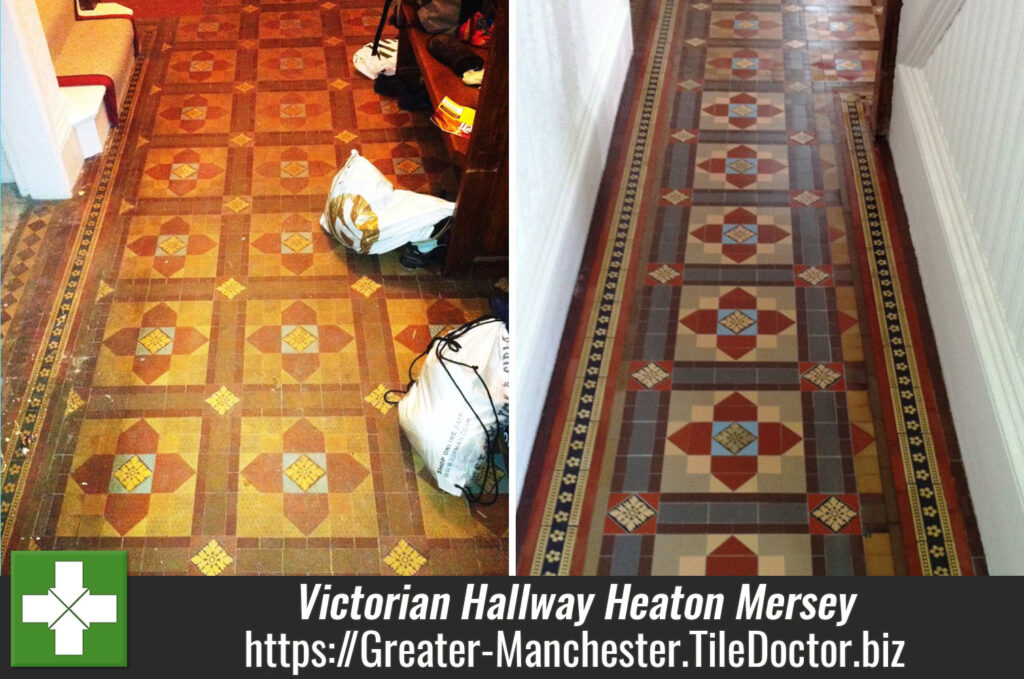
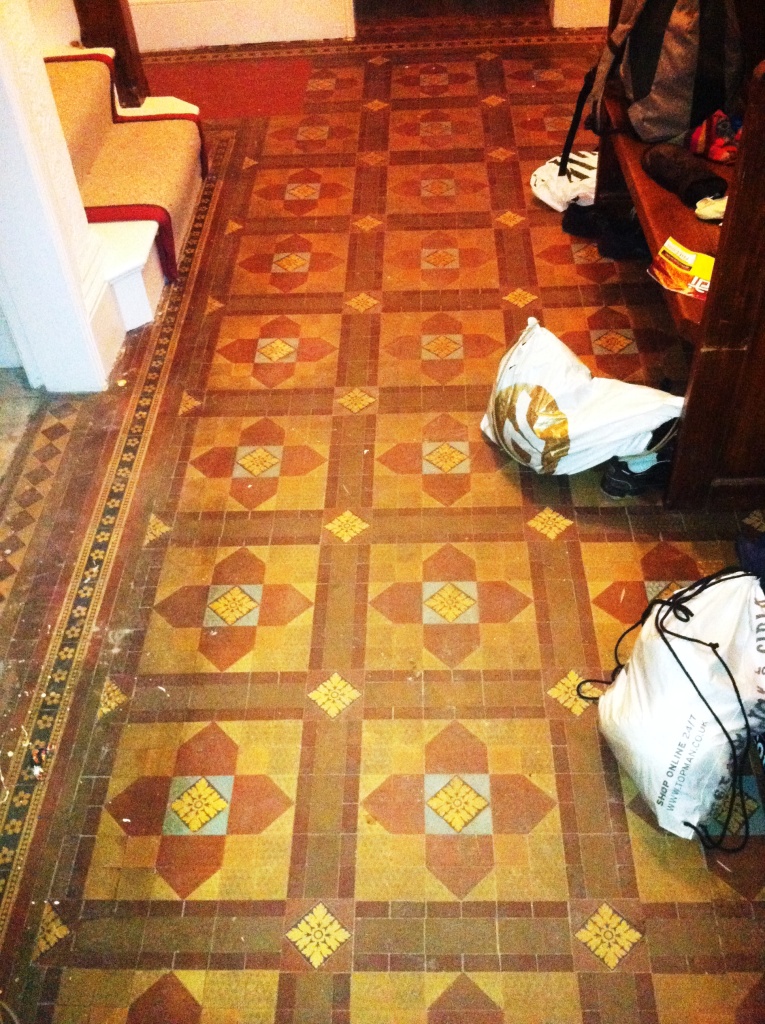
Details below of a Victoria floor tile renovation we did recently in the hallway of a house in Heaton Mersey, which is an old suburb of Stockport. The floor was an original feature in the house being laid sometime in the eighteen hundreds, some sealer was left on the floor to offer protection but most had been worn down and the floor was suffering from the impact of ground in dirt from recent building works.

Cleaning the Victorian Floor

The floor was cleaned using Tile Doctor Pro-Clean and a black buffing pad to loosen the soil that had built up on the floor. The floor was then neutralised to remove any remaining cleaning solution by rinsing it three times with water and then left to dry.

Victorian-floor-tiles-before-cleaning

Sealing the Victorian Floor

Once dry the floor was sealed with 5 coats of Tile Doctor Seal and Go which is ideal for sealing Victorian tiled floors as it brings out the colours in the tile whilst providing stain protection and allowing moisture vapour to breathe through.

Victorian-floor-tiles-After-cleaning-and-sealing

The owner Mr Mitchell was very pleased with my work and left a great testimonial which is copied below.

“Steve has done an excellent job of cleaning up a very dirty old Victorian floor. The job was not without its problems, but Steve dealt with them very professionally, taking responsibility for issues with third parties that he had little control over. He has also done an excellent job of cleaning our carpets.”


Cleaning and Sealing a Victorian floor in Heaton Mersey, Stockport

Victorian Floor Tile Cleaning Read More »

Bathroom Tile and Grout Facelift in Didsbury

Bathroom Tile and Grout Facelift in Didsbury

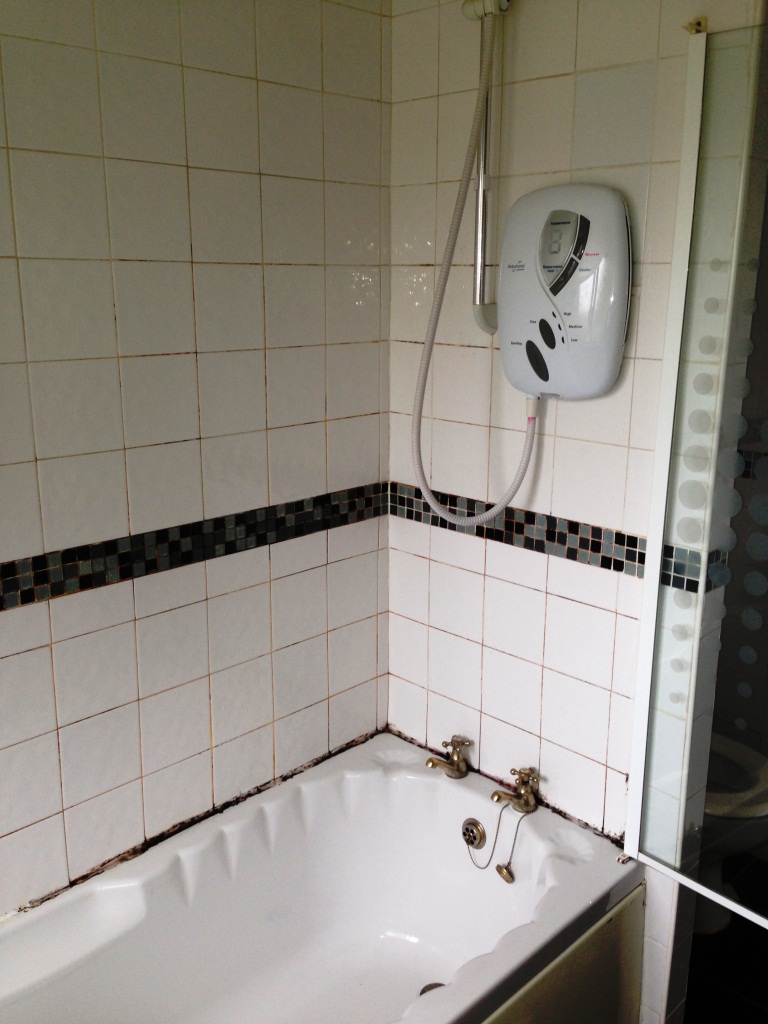
This Ceramic tiled bath with shower was installed at house in Didsbury, this customer wanted to give the bathroom a facelift and not usually it was the grout rather than the ceramic tile that had discoloured, the silicone also needed to be replaced due to the mould build-up and if you get mould on silicone it’s impossible to remove and can only be replaced. Unfortunately mould build-up in bathrooms is quite common in the UK due to our damp climate and modern insulated homes that restrict air flow. If you’re having this problem yourself consider installing a more powerful extractor fan or simply leaving the door to the bathroom open more often.

Disbury-bathroom-tile-and-grout-refresh-before

Cleaning Tile and Grout

The Ceramic tiles and grout were treated using a strong 2:1 dilution of Tile Doctor Pro-Clean which is a highly recommended Tile and Grout cleaning product; being alkaline it’s safe to use on all sorts of tile and stone surfaces. For vertical tiled surfaces I recommend the mixture is decanted into a bottle with a trigger spray attachment which when sprayed onto the wall allows the cleaner to mix with air making it lighter and allowing it to stick better. The solution was then worked in using a stiff scrubbing brush by hand before being rinsed off with water; this process was repeated a number of times until we had managed to clean all the areas and then left to dry. If you’re doing this work yourself then you should know that Tile Doctor produces a product that comes with a spray attachment called col=”https://www.TileDoctor.co.uk/Oxy-Pro-Shower-Tile-Grout-Cleaner.asp” target=”_blank”>Oxy Pro that is ready to use and can save you some time.

Whilst waiting for the tile and grout to dry the Silicone Sealer was removed using a sharp knife, as I mentioned before once mould gets a grip on silicone it will need to be replaced. It’s also worth mentioning at this point that silicone will last longer if the residue from soaps, shampoos and body washes etc. are rinsed away with clean water after having a shower as it’s the chemical and not the water that damages the silicone in the first place.

Grout Colouring

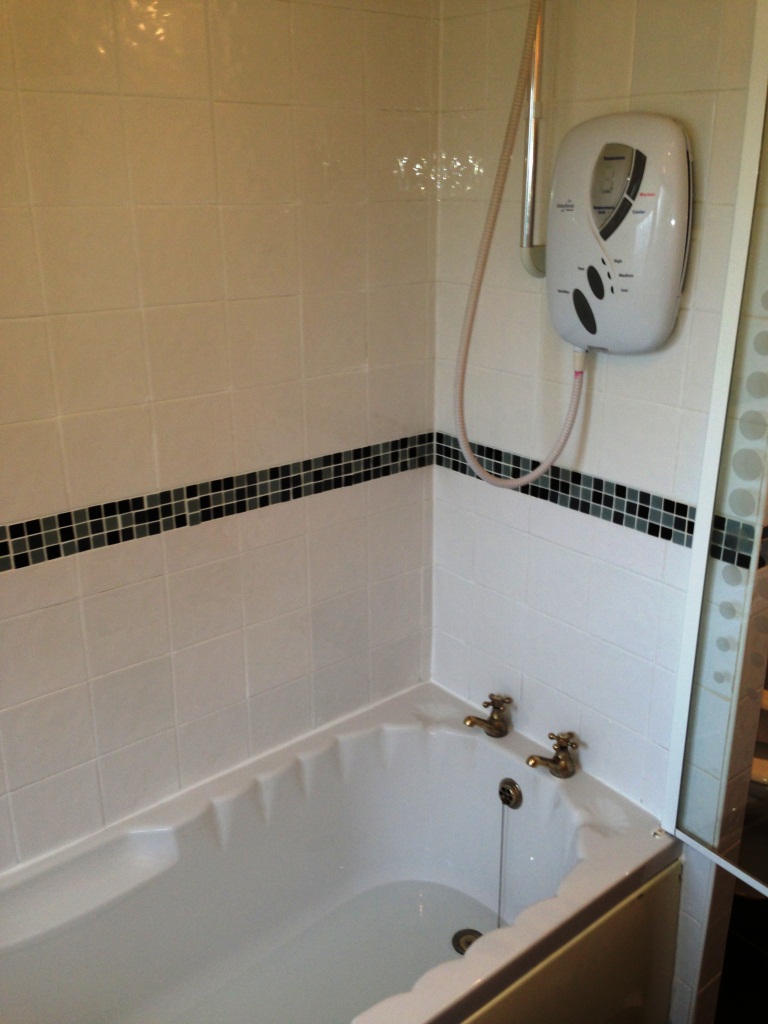
Cleaning the grout had made a visible difference and improved the overall look of the bathroom but it wasn’t showroom condition so to improve it further it was necessary to apply a white Grout Colourant. The product we use is epoxy based and forms a thin impermeable barrier over the grout so not only does it look good it protects the grout as well; it’s very easily applied using a small brush along the grout lines and you just wipe of the excess so it wasn’t long before the grout was looking like new.

Last step was to re-new the silicone sealant around the top of the bath and the job was finished; my customer was very pleased with the results and made the comment that she thought it looked like new.

Disbury-bathroom-tile-and-grout-refresh-after
 

Refreshing a Ceramic Tiled Bathroom in Didsbury

Bathroom Tile and Grout Facelift in Didsbury Read More »

=================================

Greater Manchester Tile Doctor

================================= Read More »

Scroll to Top