Author name: Kevin Parry

Covering Greater Manchester, Joe Atkinson is your local specialist for tile cleaning, stone cleaning, grout cleaning and tile, stone and grout sealing covering the restoration of all types of stone and tiled flooring including Ceramic, Limestone, Marble, Porcelain, Quarry, Sandstone, Slate, Terracotta, Terrazzo, Travertine and Victorian tile

Ceramic Tile Grout Bathroom Before and After Grout Colouring Manchester

Bathroom Tile and Grout Refresh in Manchester City Rental Apartment

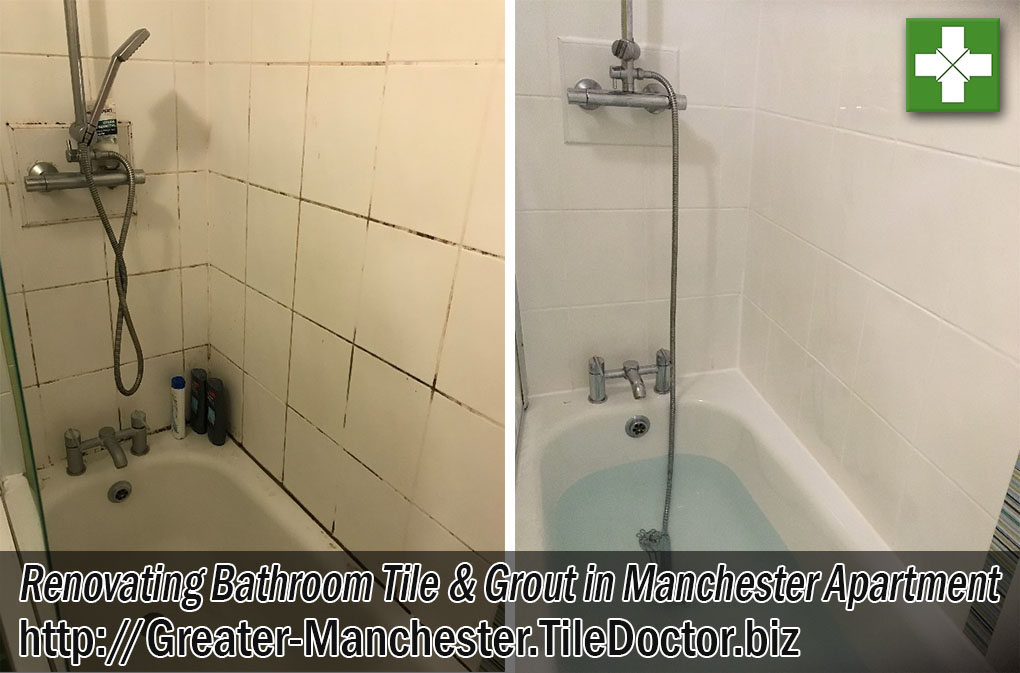
A client with a high-rise apartment in Manchester city centre contacted us in relation to the look of their bathroom tiles. The grout had become grubby and black with mould and it was clear from their message that they were considering have the grout replaced in order to freshen up the bathroom.

We discussed the problem over the telephone, and they emailed a picture of the bathroom across so I could get a better idea of what needed doing. It turns out that the apartment had been rented out previously and they needed the bathroom renovating so they could start letting it again. Clearly, they were keen to have the work completed as soon as possible. Fortunately, we are sometimes able to come out on short notice, especially for small jobs like this and so were able to do the work the following week

Manchester Rental Apartment Bathroom Before Grout Colouring

Re-grouting is a lot of work and very time consuming so I explained the benefits of Grout Colouring which is much quicker and results in a more practical finish as I will explain. There was a small issue with parking as one would expect from the city centre, but we were able to use one of the parking spaces of a neighbour in the basement of the building.

Cleaning the Grout and Tiles in a Ceramic Tiled Bathroom

My first task was to get the grout as clean as possible before applying the colourant and given the amount of mould I decided to apply Tile Doctor Duo-Clean which is a Tile Cleaner/Mould Remover and ideal for use on ceramic tile and grout. The product was sprayed onto the tiles and grout and then scrubbed in by hand to get the grout as clean as possible. I also used a powerful steam cleaner to get the grout as clean as possible before rinsing the soil off with water. This process went well, and the grout looked much cleaner afterwards but was now a little patchy in places due to deep staining.

It’s worth noting that mould thrives in damp warm conditions and can easily be controlled by ensuring the bathroom has adequate ventilation. Some modern showers have a function that cool the bathroom down after use by running the shower on a cold setting. Improving cross-ventilation by leaving the bathroom door and a window open can also improve the situation and of course you can always apply Tile Doctor Duo-Clean on a regular basis.

Recolouring Grout in a Ceramic Tiled Bathroom

Once the grout was dry and as clean as it could be, I applied a White Tile Doctor Grout Colourant along the grout lines with a small brush taking care to wipe off any excess from the tiles as I went. Only one bottle of colourant was needed, and I have found baby wipes work well when wiping off the excess.

The last step in the bathroom renovation was to strip out all the old mouldy silicone between the bath and the tiles and replace with new mould resistant silicone.

The cleaning and grout colour completely transformed the look of the bathroom leaving it looking fresh. The grout which was previously dark and patchy was now a consistent white colour giving the impression it had only been recently tiled. The colourant also forms an epoxy barrier over the grout that will prevent dirt from becoming ingrained in the grouts surface going forward, it’s also much easier to clean.

Manchester Rental Apartment Bathroom After Grout Colouring

The customer was most impressed with the result and has informed us since that they will back in touch about renovating the grout in their own home! They left the following comment on the Tile Doctor website.

“Kamila made a wonderful job cleaning my grout and silicone. The bathroom looks like new. She was also easy to deal, very friendly and professional. Thank you!”


Professional Bathroom Tile and Grout Refresh in Manchester Apartment

Bathroom Tile and Grout Refresh in Manchester City Rental Apartment Read More »

Varnished Marble Tiled Floor Grout Before After Renovation Oldham

Chequered Marble Tiled Porch Renovation in Oldham

Our client contacted us after they moved into a house built circa early 1900 with many Victorian era features. One of them was lovely tiled floor in their porch which consisted of a chequered pattern of Black and White Marble tiles. The white tiles were especially grubby and in need of a deep clean. Being a fan of period features they were keen to see if the tiles could be renovated back to their former glory.

The property was in Oldham, which is approximately 7 miles to the north east of Manchester near to Rochdale and well known for its history in the textile industry. We conducted a test on the tiles which worked well, and we were confident the whole floor could be significantly improved. The client was satisfied, we agreed a price and the job was booked in.

Marble Tiled Victorian Porch Before Restoration Oldham Marble Tiled Victorian Porch Before Restoration Oldham

Cleaning/Repairing a Marble Tiled Hallway Floor

Initially, to clean the floor we used Tile Doctor Remove and Go which was applied to the floor and left to soak into the tile and soften the dirt. This was followed up by scrubbing the product into the floor with a coarse black pad fitted to a rotary machine. The machine scrubbing really gets into the dirty areas and the grout lines. During the work we discovered that two of the tiles were loose, so they had to be removed, cleaned up and then re-secured using a flexible tile adhesive.

Being Tile Doctors, we are trained in all thing tile and so unlike regular cleaning businesses we are happy to carry out repairs along side the cleaning process. It also means we have a deeper understanding of the materials we are working with which enables us to complete the job to the highest standard.

Marble Tiled Victorian Porch During Restoration Oldham Marble Tiled Victorian Porch During Restoration Oldham

We left site for a short while and then returned to carry out the sealing process which would protect them from dirt and stains going forward. It was a relatively small area and so it wasn’t long before the tiles were dry, and the new adhesive had set.

Sealing a Marble Tiled Hallway Floor

The floor was sealed with two coats of Tile Doctor Colour Grow, which is an impregnating breathable sealer that will cope will with the damp environment and the elements that the floor would be subjected to in an external location. This product also enhances the black and white contrast in the tiles improving the overall look of the floor.

Marble Tiled Victorian Porch After Restoration Oldham

I think you will agree the pictures speak for themselves. It is lovely when you can get an old floor back to looking how it was when it was laid originally. The customer was astonished with the result and left the comment below.

Kamila from STOCKPORT was excellent. Did a wonderful job of refurbishing the Victorian tiles in our porch, was quick efficient and very accommodating to our timetables
Yvonne L, Oldham

Marble Tiled Victorian Porch After Restoration Oldham Marble Tiled Victorian Porch After Restoration Oldham


Professional Cleaning of a Marble Tiled Porch in Greater Manchester

Chequered Marble Tiled Porch Renovation in Oldham Read More »

Terrazzo Kitchen Tile Floor Before After Cleaning Manchester

Deep Cleaning Grubby Terrazzo Kitchen Tiles at Manchester Apartment

I recently visited a customer with a grubby Terrazzo tiled kitchen floor who lived in the Skyline Apartments in the centre of Manchester. Billed as luxury accommodation the building has a Gym and apparently a 20-metre swimming pool on the roof. The floor in the Kitchen was around 6m square and my customer originally thought the tiles were Limestone, but I was able to confirm they were Terrazzo, not that it mattered from my point of view as the cleaning process would be the same.

Terrazzo Kitchen Floor Before Cleaning Skyline Apartments Manchester

The previous owner of the apartment had never maintained the floor properly, so my customer inherited a very grubby Terrazzo floor and had tried getting rid of the dirt without much success. After running a few tests, I could see that that any protective sealer had long since failed and dirt was now ingrained in the pores of the tile. The tiles would now need to be burnished to restore the appearance and then sealed to protect it from ingrained dirt going forward.

Cleaning and Polishing a Terrazzo Tiled Floor

To get the floor clean and ensure what was left of the old sealer was removed I scrubbed a strong dilution of Tile Doctor Remove and Go into the tiles. This product works best if you leave it to dwell on the tile for around ten minutes before working it in. Afterwards the soiled product was removed using a wet vacuum which makes light work of extracting liquids from hard floors.

To burnish the Terrazzo, I used a set of Tile Doctor Burnishing pads which are applied to the floor using a rotary floor buffer running a slow speed in sequence from coarse to very fine. Lubricated with water this process uses a coarse pad to cut back through the tile to remove marks and ingrained dirt. This is followed by the medium and fine pads rinsing the floor with water in between each pad and extracting the soil with a wet vacuum. The last pad which is a 3000-grit very fine pad is applied dry to the floor with only a little water sprayed onto the tile using a process we call a spray burnish.

Being a kitchen there were a few deep stains in the floor which I was able to spot treat with Tile Doctor Reduxa which is an interesting product that is absorbed into the floor and then when heat is applied it evaporates lifting the stain out with it.

Terrazzo Kitchen Floor After Cleaning Reduxa Skyline Apartments Manchester

Sealing a Terrazzo Tiled Kitchen Floor

To seal the Terrazzo, I used two coats of Tile Doctor Colour Grow which as the name suggest is a colour enhancing sealer. The product works by soaking into the tile occupying the pores so dirt cannot become ingrained there. It added a lovely finish to the Terrazzo, enhancing its appearance and will make the floor much easier to keep clean going forward.

Terrazzo Kitchen Floor After Cleaning Skyline Apartments Manchester

The completed floor now looks clean and fresh and an amazing transformation considering how dirty the floor looked when I first arrived. My customer was very pleased with the improvement and left the following short comment on the Tile Doctor feedback system.

Kamila is the best!! great job.

Terrazzo Kitchen Floor After Cleaning Closeup Skyline Apartments Manchester


Restoring a Terrazzo Tiled Kitchen and Family room Floor in Manchester

Deep Cleaning Grubby Terrazzo Kitchen Tiles at Manchester Apartment Read More »

Mouldy Ceramic Tile Grout Before and After Cleaning Eccles

Mouldy Ceramic Tiled Bathroom Restored in Eccles

An elderly couple from the Greater Manchester town of Eccles were in touch recently regarding their Ceramic Tiled Bathroom, they had a big problem with mould build-up due to a broken extractor fan and wanted it removing. Mould grows in humid conditions and with the extractor fan out of action it soon started to spread. If you have been reading my blog, you will have seen some of the bathroom transformations we have completed over the years, so I was confident we could resolve the problem for them and paid them a visit to take a look.

Mouldy Bathroom Before Restoration in Eccles
You can see from the photographs that the tiles were in good physical condition, but the grout and silicone mastic sealant was stained with shampoo dyes and mould spots, the worst part however was the ceiling which was covered in mould growth. I ran a test clean on the bathroom wall grout and ceiling which went very well so we quickly agreed on a date to clean the whole bathroom.

Mouldy Bathroom Before Restoration in Eccles

Cleaning a Ceramic Shower Cubicle

They say you should always start at the top and work down so my first task was to treat the mouldy bathroom ceiling with Tile Doctor Duo Clean which although marketed for use on grout it worked just as well on paint to remove the mould. When done with ceiling I moved on to the wall tiles spraying on Duo Clean, letting it soak in for ten minutes, working it in to the grout with a stiff brush and then rinsing off with water.

With four walls of tile and grout and a ceiling to clean the overall cleaning process took two days to complete and at the end of the second day I turned my attention to the silicone sealant. Taking care not to scratch the bathtub I carefully stripped out the silicone in-between the tile and bath with a sharp knife. Duo Clean works on silicone as well but you do need to catch it early so often the easiest thing to do is to replace it rather than clean it. I replaced the silicone with a good quality mould and bacteria resistant silicone.

When I returned on the next day I carried on with the Top/Down approach by turning my attention back to the ceiling which I painted with a white moisture resistant emulsion paint.

Mouldy Bathroom After Restoration in Eccles Mouldy Bathroom After Restoration in Eccles

With the ceiling freshly painted I then took another look at the grout which although clean was not a perfect white anymore and looked dull and uninviting. We do find this can happen with grout, especially if it isn’t the subject of a regular cleaning regime. There is a remedy though and what we find works well in these cases is to recolour the grout with an epoxy-based Grout Colourant which not only rejuvenates the grout it also protects it for years to come.

Grout Colouring Bathroom Wall Tiles

There are ten colours to choose from in the Tile Doctor range of Grout Colourant however in this case I felt the best outcome would be to use a White colourant to match the tiles and restore the original look of the bathroom.

The colourant is easily applied directly to the grout and in this case, I applied two coats with the aid of a small brush making sure to remove any excess that comes into contact with the tile. After applying the colourant, the bathroom transformation was complete, and it looked like a new installation.

Mouldy Bathroom After Restoration in Eccles
It was a lot of work however I was really happy with the outcome and so were the clients who even left me a nice tip. The last thing to sort out is the extractor fan, however they will need a different tradesman for that job.

Bathroom Tile Renovation in Greater Manchester

Mouldy Ceramic Tiled Bathroom Restored in Eccles Read More »

Burnishing and Sealing to Restore Travertine Tiles in Bury

Burnishing and Sealing to Restore Travertine Tiles in Bury

Travertine is a distinct and characterful stone that makes for some truly beautiful tiled floors. However, like any natural stone the main difficulty with Travertine tiles is keeping them looking fantastic and unfortunately without regular maintenance its appearance can decline over time.

This customer, who lives in Bury, contacted me for this exact reason. For the past decade, she had attempted to keep her Travertine floor clean by using some kind of wax polish, only to find that this actually made maintenance more difficult, the wax built up in layers and was difficult to remove.

Travertine Tiled Floor Before Cleaning Bury

I visited the property to conduct a test clean and determine the kind of results I could achieve through restoring the entire floor. The customer was very impressed with the small area I cleaned and booked me in on the same day to complete the full job.

Travertine Tiled Floor Before Cleaning Bury

Cleaning a Travertine Tiled Floor

As a result of my successful test clean, I already knew that the best process to restore the tiles was burnishing. This involves the application of different grades of diamond encrusted burnishing pads to strip away dirt and staining, and gradually polish the stone to achieve a quality shine.

Normally on Travertine tiles I would start by applying the Coarse 400 and Medium 800 grit pads, followed by moving up to Fine 1500 and Very Fine. In this particular case, I started by using a Very Coarse 200 grit burnishing pad to strip off the wax coating and old sealers from the tiles. The pad was fitted to a rotary machine and lubricated with a small amount of water.

After finishing with the 200-grit pad, I removed all soiled water with my wet vacuum. There were still few areas of wax left in the corners of the room, and on these areas, I used a 200 grit handheld burnishing block.

When I finished with first round of burnishing, I repeated the exact same process with the 400, 800, and 1500 grit pads, rinsing away the soil in between until I was left with a high quality polished finish right across the floor.

Travertine Tiled Floor During Polishing Bury

After completing the burnishing, I filled a number of small pitted holes in the stone using a beige flexible epoxy-based grout to match the rest of the floor. I then left the floor to dry until the next day.

Sealing a Travertine Tiled Floor

The next day I returned to the property and used a damp tester to make sure the floor was dry enough for sealing. Usually with polished tiles this isn’t a problem, but sometimes the grout can be an issue. Luckily, there weren’t any issues with dampness.

Before sealing I went over the floor again using the Very Fine grit pad with a tiny amount of water as lubricant. Finally, I sealed the floor with our impregnating sealer known as Tile Doctor Colour Grow. The sealer penetrates the stone and enhances the natural colours and patterns in the stone. I polished off any excess sealer with several cotton cloths.

Travertine Tiled Floor After Cleaning Bury

To make sure the floor was in pristine condition I went over the floor for a final time with the Very Fine grit pad to smoothen the surface after sealing.

Travertine Tiled Floor After Cleaning Bury

The customer was extremely pleased with the result, and even promised to recommend me to her daughter to clean and seal her Marble tiled floor. I also left her a free bottle of Tile Doctor Neutral Tile Cleaner to help her ensure the floor stays beautiful, we recommend Neutral Clean for the regular cleaning of sealed floor as most supermarket cleaners are acidic and will reduce the life of your sealer over time.


Restoring the Polish on a Travertine Tiled Floor in Greater Manchester

Burnishing and Sealing to Restore Travertine Tiles in Bury Read More »

Restoring Dull and Dirty Sandstone Floor Tiles in Hattersley

Restoring Dull and Dirty Sandstone Tiles in Hattersley

This property in Hattersley had just undergone major building works which had lasted for couple of years. During that time the Sandstone tiled living room floor had suffered greatly during the building works.

Sandstone Floor Before Cleaning in Hattersley

Additionally, the sealer previously used on the floor was a clear impregnating product which did nothing to bring out any natural colours in the Sandstone, leaving them dull and lifeless. The situation had been made worse but the building work mess, and the property owners were keen to get their local Tile Doctor in to resolve the problems.

Sandstone Floor Before Cleaning in Hattersley

Cleaning a Dull and Dirty Sandstone Tiled Floor

For the cleaning process, I used a strong dilution of Tile Doctor Pro Clean, which is our strong alkaline flexible cleaner meant for heavy duty cleaning and when used in more concentrated form for the stripping away of old sealers. I applied a strong dilution of Pro Clean across the floor and left it to dwell for about ten to fifteen minutes so it could work its magic on the layers of dirt and old sealer.

I followed this by getting on my knees and scrubbing the product into the stone with a stiff scrubbing brush. In this particular scenario, there wasn’t much that could be done with a rotary machine as the floor was very rough in texture and with a scrubbing brush it was much easier to reach the ingrained dirt.

After scrubbing, I removed all of the dirty cleaning solution with a wet vacuum, before rising the floor several times with clean water to get rid of all chemicals. With the cleaning process a success, it was time to leave the floor to dry for 48 hours before sealing.

Sandstone Floor During Cleaning in Hattersley

Sealing a Sandstone Tiled Floor

When I returned two days later to seal the tiles I started by using my damp tester to check for moisture that could affect the performance of sealer. Even the smallest quantity quantity of moisture can cloud the sealer and reduce its effectiveness.

Once satisfied that the floor was completely dry, I started sealing. I chose to use a topical Tile Doctor sealer called Seal & Go, which is a water based blend of acrylic polymers that is recommended for this type of stone providing stain resistance whilst enhancing the look of the tiles and providing an aesthetically pleasing low sheen finish.

I applied four coats of the sealer and the transformation was complete. I think the result speaks to itself, especially when you look at the before and after photos.

Sandstone Floor After Cleaning and Sealing in Hattersley

After completing the work, I left the very happy customers with a complimentary bottle of Tile Doctor Neutral Tile Cleaner to help them make sure future cleaning and maintenance is done correctly.

Sandstone Floor After Cleaning and Sealing in Hattersley

The customers were really pleased with the transformation in their floor and were good enough to leave the following feedback on the Tile Doctor website:

“Tony was very professional and did a great job on our Sandstone floor. We are really pleased with the results.”


Professional Sandstone Floor Restoration in Greater Manchester

Restoring Dull and Dirty Sandstone Tiles in Hattersley Read More »

Old Quarry Tiled Floor Restored in Hale

Dirty Quarry Tiled Floor Transformed in Hale

We are very often contacted by customers to restore tiled floors they didn’t even know existed. Usually, the tiles will be hidden away underneath either carpet or, in some cases, linoleum. And, once the tiles are discovered, the likelihood is that the property owners want to have them restored to their original condition which is understandable as original features definitely add value to a property.

Here’s an example of this sort of work that I recently undertook at a property in the affluent suburb of Hale which is only ten miles from Manchester. The recently discovered floor in question was formed of very nice (but also very dirty) Quarry tiles. The customers had just bought the property and, having pulled up the carpets on the ground floor, were surprised with what they found.

Quarry Tiles in Hale Before Cleaning

They really wanted to get the floor restored in order to highlight the original character of the property, however, it was very heavily soiled and marked with glue deposits that proved very difficult for them to remove. As a result, they opted to search online for a solution – finding Tile Doctor in the process.

Quarry Tiles in Hale Before Cleaning

In the first instance, I visited the property to conduct a test clean and, with the customers pleased the result, we agreed dates for the full restoration to be carried out.

Cleaning a Dirty Quarry Tiled Floor

For cleaning the floor I started by using Tile Doctor Remove & Go, a product which is specially designed for removing coatings such as sealers, waxes and adhesives from tile – including the types of glue deposits left upon the removal of carpet. I left the product to dwell on the floor for 10 minutes before scrubbing it in to the tiles with a black scrubbing pad fitted to a rotary machine.

Next, I removed the now soiled cleaning solution with my wet vacuum and rinsed the floor several times with water to neutralise it, again followed by extracting the water after every rinse. Overall, the cleaning process was a success, but there were a few problem areas where the adhesive proved particularly difficult to remove.

Quarry Tiles in Hale During Cleaning

To these areas I applied Tile Doctor NanoTech HBU Remover, which is a heavy build-up remover designed to work where other cleaners won’t. It utilises nano-sized particles to penetrate below tough stains and eliminate them. This was left to work its magic for about half an hour.

Following this, I steamed the tiles to soften the adhesive even further and then scrubbed the problem areas with hand held black scrubbing pads. This cleaning combination worked really well to clean the problem areas and all I had to do next was rinse them properly, before leaving the whole floor to dry.

Quarry Tiles in Hale After Cleaning

Sealing a Quarry Tiled Floor

I returned to the property after allowing the floor to dry for three full days. Thankfully, I found that there were no damp issues to address, and so I could proceed with sealing without a problem.

Quarry Tiles in Hale During Sealing

The customers wanted to keep the floor as natural looking as possible, so I opted to use Tile Doctor Colour Grow, our impregnating sealer which soaks into the pores of the tile protecting it from within enhances the colours in the process and leaving a matte finish. I applied several coats before polishing off the excess using cotton cloths.

Quarry Tiles in Hale After Cleaning

Looking at the before and after photos, I think you can agree that the floor is transformed! Certainly, my customers agreed – the newly restored Quarry floor will be a real asset to the property.

Quarry Tiles in Hale After Cleaning


Dirty Quarry Tiled Floor Hidden Under Carpet Restored in Greater Manchester

Dirty Quarry Tiled Floor Transformed in Hale Read More »

limestone floor before and after polishing in peel green

Dull Limestone Tiles Brought Back to Life with Burnishing in Peel Green

This beautiful Limestone kitchen tiled floor at a property in Peel Green was only a year old and, while it wasn’t in too bad of a state, the customer told me the floor had not been sealed properly due to issues with retaining moisture. The lack of an adequate sealer had allowed the Limestone to become duller over time after exposure to dirt and muck. It also had some more obvious marks and stains in some place and needed some grouting to be done around the corners and edges of the room.

Limestone tiled floor before burnishing Peel Green Limestone tiled floor before burnishing Peel Green

I travelled to the property in Peel Green, which is within the Greater City of Salford in Greater Manchester, to see what could be done to restore the condition of the tiles.

Burnishing Dull Limestone Kitchen Tiles

Upon closer inspection of the tiles, I recommended to the customer that we proceed with the process known as burnishing, which we use primarily on Limestone, Marble, and Travertine. Burnishing, which involves the application of diamond encrusted burnishing pads, breaks down old sealers, gets rid of marks, stains and ingrained dirt, and gradually builds and evens out the polish on the tiles.

I started burnishing the Limestone kitchen tiles straight away when I arrived at the property as it was a big area and would require lots of hard work to achieve the desired results within the space of a day.

Our burnishing system consists of four diamond encrusted pads: Coarse, Medium, a Fine and Very Fine. Each pad was applied to the Limestone in sequence in tandem with a small amount of water to act as lubrication, gradually smoothing and polishing the surface of the tiles. After every pad, I also used my wet vac machine to remove any dirty water left on the floor and, after the Fine pad I rinsed the floor thoroughly to remove any dirt left on floor. I then left it to dry.

Sealing Limestone Kitchen Tiles

When I was satisfied that the floor was completely dry, it was time to seal the Limestone tiles. However, I first went over the floor with Very Fine grit pad to provide a final polish before sealing.

My choice of sealer was the impregnating Tile Doctor Colour Grow, a product which enhances the natural colours in the stone whilst also offering robust protection against dirt and stains. Remembering that the tiles had never been properly sealed, I applied plenty of sealer and left it to dry for 10 minutes. Following this, I carefully removed any excess sealer left on the surface with a dry cotton cloth. After sealing I went over the floor once final time with the Very Fine pad, just to smoothen things down and leave an exceptionally neat finish.

Limestone tiled floor before burnishing Peel Green

When the job was finished, I gave the owner some tips and recommendations on the cleaning of the floor going forward and a complimentary bottle of neutral cleaner to get them started.

Limestone tiled floor after burnishing Peel Green Limestone tiled floor after burnishing Peel Green

The customer was very pleased with the finish, so much so that she opted and take up the Tile Doctor Maintenance Plan to keep the floor looking good for years to come! This involves popping round every 6-12 months to top up the sealer and give the floor a quick polish.


Professional Maintenance of a Dull Limestone Tiled Floor in Greater Manchester

Dull Limestone Tiles Brought Back to Life with Burnishing in Peel Green Read More »

shower cubicle before and after cleaning in dane bank

Shower Cubicle Cleaning and Re-Colouring in Dane Bank

Shower and bathroom mould and soap scum growth are probably the most common, annoying and frustrating tile-related problems. Wet and high humidity areas with poor ventilation provide the perfect breeding ground for mould and stains. Soap residue and body oils also create a food source for soap scum, mould to grow.

My customer in Dane Bank had the exact problem with dirty and mouldy grout lines in her shower cubicle. She had tried scrubbing the grout lines herself with a toothbrush and standard supermarket cleaners but never got the result she wanted.

Shower cubicle before refresh in Dane Bank

Fortunately she was lucky to find Tile Doctor from the internet and I was asked to pop over and take a look to see what could be done. I was confident we could make a big difference so I went through the options with her and give her price for the job. She was happy with the price and we agreed a date for me to return and complete the work.

Shower cubicle before refresh in Dane Bank

Cleaning a Ceramic Shower Cubicle

For grout lines cleaning I used Tile Doctor Grout Colorant Pre-Treat Cleaner, which successfully removes dirt, soil, soap scum and hard water deposits from grout joints. The product was sprayed on to the grout and left to dwell and seep into the pores for approximately five minutes to break down the soap scum and dirt before being scrubbed in using a stiff grout brush. The cleaning was successful but there were still few mouldy spots left. On these spots I used Tile Doctor Mould Away Spray that is meant for quick removal of mould from grout and silicone. One again product got sprayed on grout lines and left to dwell for five minutes and then scrubbed with stiff grout brush and then rinsed with clean water. After I had finished cleaning I express dried the tile and grout using high power heat gun.

Grout Colouring in a Shower Cubicle

With the area nice and dry, I had to choose the matching colour for the existing grout. There are ten colours to choose from the Tile Doctor range of Grout Colourant and on this occasion we chose Limestone as the best colour to match the tile.

Shower cubicle after refresh in Dane Bank

The colourant is easily applied directly to the grout and in this case I applied two coats. The product is epoxy based and completely seals and rejuvenates the appearance of the grout, which not only drastically improves appearance it also makes it much easier to clean in the future. After applying the re-colourant I buffed all grout colorant excess off the tiles and the shower cubicle was ready.

Shower cubicle after refresh in Dane Bank

My customer was very satisfied with the work and left the following comment on the Tile Doctor Feedback system

“Really, really happy with the service Tony provided and the recommendations he suggested. The work was carried out in a highly professional manner, to a high standard. I have already recommended him to friends. Thank you”


Shower Tile Refresh in Greater Manchester

Shower Cubicle Cleaning and Re-Colouring in Dane Bank Read More »

Encaustic Cement Tiles Burnished and Sealed in Stockport

Encaustic Cement Tiles Burnished and Sealed in Stockport

I’m often asked if you should seal a tile before grouting and the answer is a definite yes, and this Encaustic Cement tiled bathroom floor installation in Stockport is a great example as to why. The tiles had not been sealed before grouting and then, once the tiler went to grout the newly installed tiles with a grey grout, the colour ran into the tiles, staining them and leaving them looking grubby and dirty. Had the tiles been sealed it would of made the process of removing the grout from the surface of the tile much easier.

If you haven’t come across them before Encaustic cement tiles are often hand painted and are available in a range of beautifully artistic patterns, so it was a real shame that these tiles were allowed to be spoilt by an avoidable mistake. As you can imagine, the property owner was keen to have the tiles professionally restored, and she contacted me to get the job done. I took some photographs but I’m not sure that they do justice to the problem.

Encaustic Cement Floor Tiles Before Cleaning Stockport

Burnishing and Sealing Encaustic Cement Tiles

Rather than use a liquid cleaning product, I opted to use diamond encrusted handheld burnishing pads to remove the grout stains. Our burnishing system comprises four pads of varying grits. I started with the Coarse grit burnishing pads applying to the tiles it with a small amount of water as lubricant to grind down the grubby marks. Following this I worked my way through the system, applying Medium, Fine and Very Fine pads to gradually restore the appearance of the floor. Once the burnishing process has been completed I rinsed the tiles and then accelerated the drying process using a heat gun to prepare them to be sealed.

Sealing Encaustic Cement Tiles

Removing any excess moisture before sealing is essential as even a small amount can cloud the sealer and prevent it from properly protecting the tiles from dirt and stains. Once satisfied that the floor was dry, I proceeded to seal it using Tile Doctor Colour Grow. As an impregnating sealer Colour Grow penetrates deep into the pores of the stone to fill them and thus prevent dirt from becoming ingrained. Colour Grow’s colour intensifying properties also really accentuated the patterns of the Encaustic Cement tiles.

Encaustic Cement Floor Tiles After Cleaning Stockport

Now that these fantastic tiles have been properly sealed it will be far easier for the customer to keep them clean in future. Needless to say, she was very happy with the result. We recommend topping up your sealer on a regular basis to ensure problems like those which occurred here do not damage the appearance of your tiles.


Professional Tile Burnishing, Cleaning and Sealing for an Encaustic Cement Tiles Bathroom Floor Restoration in Stockport

Encaustic Cement Tiles Burnished and Sealed in Stockport Read More »

Scroll to Top