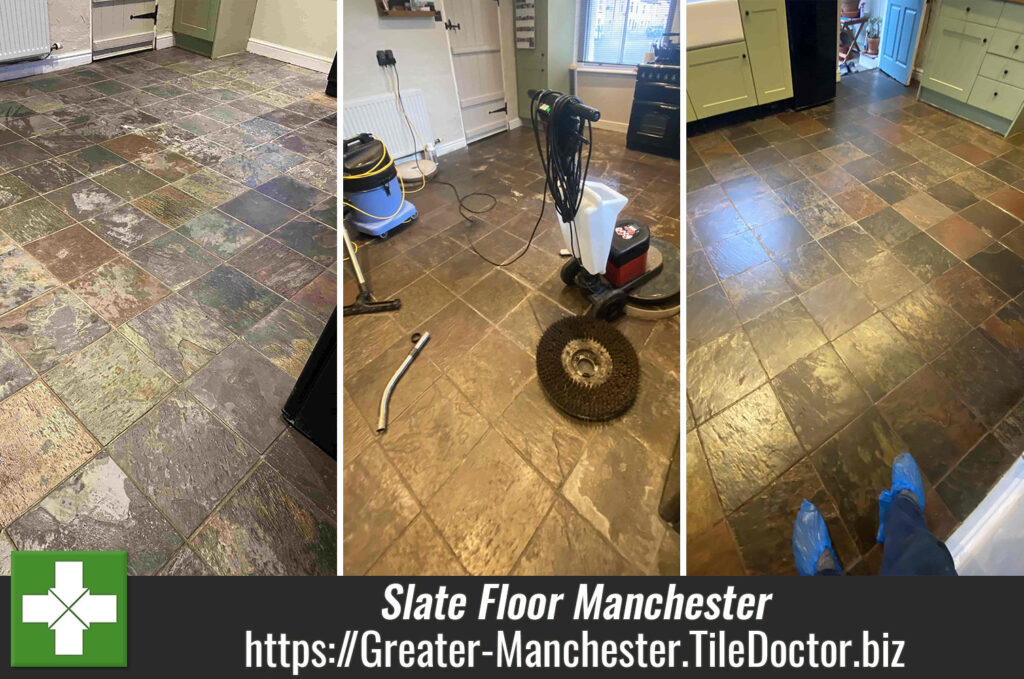
20m2 Multi-Coloured Indian Slate Kitchen Floor Manchester
A lovely lady from Manchester contacted us early in the new year about her beautiful Indian Slate floor that had been laid in her Kitchen 18 years ago. It turns out over Christmas, a leak occurred under the kitchen units and although the kitchen itself wasn’t flooded, water had seeped under the tiles and has caused them to look quite ‘cloudy.’ In addition, she explained there was also some flaking of the tile which happened when she had a new integrated dishwasher fitted a few months ago. Keen to have the problem resolved we were asked if we could possibly restore her once lovely floor to its former glory.

After further discussion I paid a visit to the property to take a closer look. It was clear a mixture of impregnating sealers and topical sealers had been used previously. These had degraded due to wear and tear and the flood had left the floor looking damaged and patchy. The floor was around 20m2 and the slate was multi-coloured.
 |
 |
I recommended carrying out a deep restorative clean of the slate tiles and grout to remove the old sealers and then re-seal to protect the floor going forward. I created a quote for the work which was accepted and a date set for the work to begin.
Cleaning an Indian Slate Tiled Kitchen Floor
I was wary the Slate tiles had been exposed to a lot of water previously, so I decided to do the initial clean with Tile Doctor Oxy-Gel which being in gel form is a low moisture cleaner. This was worked in with a silicon carbide brush fitted to a mechanical slow speed buffing machine and then extracted with a wet vacuum. This worked well but it was clear something stronger would be needed to remove all the sealer.

I next applied Tile Doctor Remove and Go which is a dedicated coatings remover and this was worked in using a coarse 100-grit pad. Except for the edges and grout lines which were hand cleaned, I used the buffer machine to work the product into the tile. All soils were then removed using a wet vacuum.
Next the area was neutralised by giving the floor an acid wash using Tile Doctor Acid Gel which was worked in using a 200-grit pad before rinsing with water, again all removed with a wet vacuum system. It was then left to fully dry overnight assisted by a couple of air blowers.
Sealing an Indian Slate Tiled Kitchen Floor
After sampling a couple of different sealers, it was agreed that Tile Doctor X-Tra Seal worked best to bring out the colour and give a low sheen to the floor. Just one coat was needed and after wiping off the excess sealer a white pad was used to finish with a short burnish.
My client was very happy with the result and left the following feedback.

For aftercare cleaning I recommended the use of Tile Doctor Neutral Tile Cleaner which is a mild but effective product that won’t affect the new sealer.
 |
 |
Professional Restoration of an Indian Slate Tiled Kitchen in Greater Manchester
20m2 Multi-Coloured Indian Slate Kitchen Floor Manchester Read More »